🦜 Next.js 项目,完。
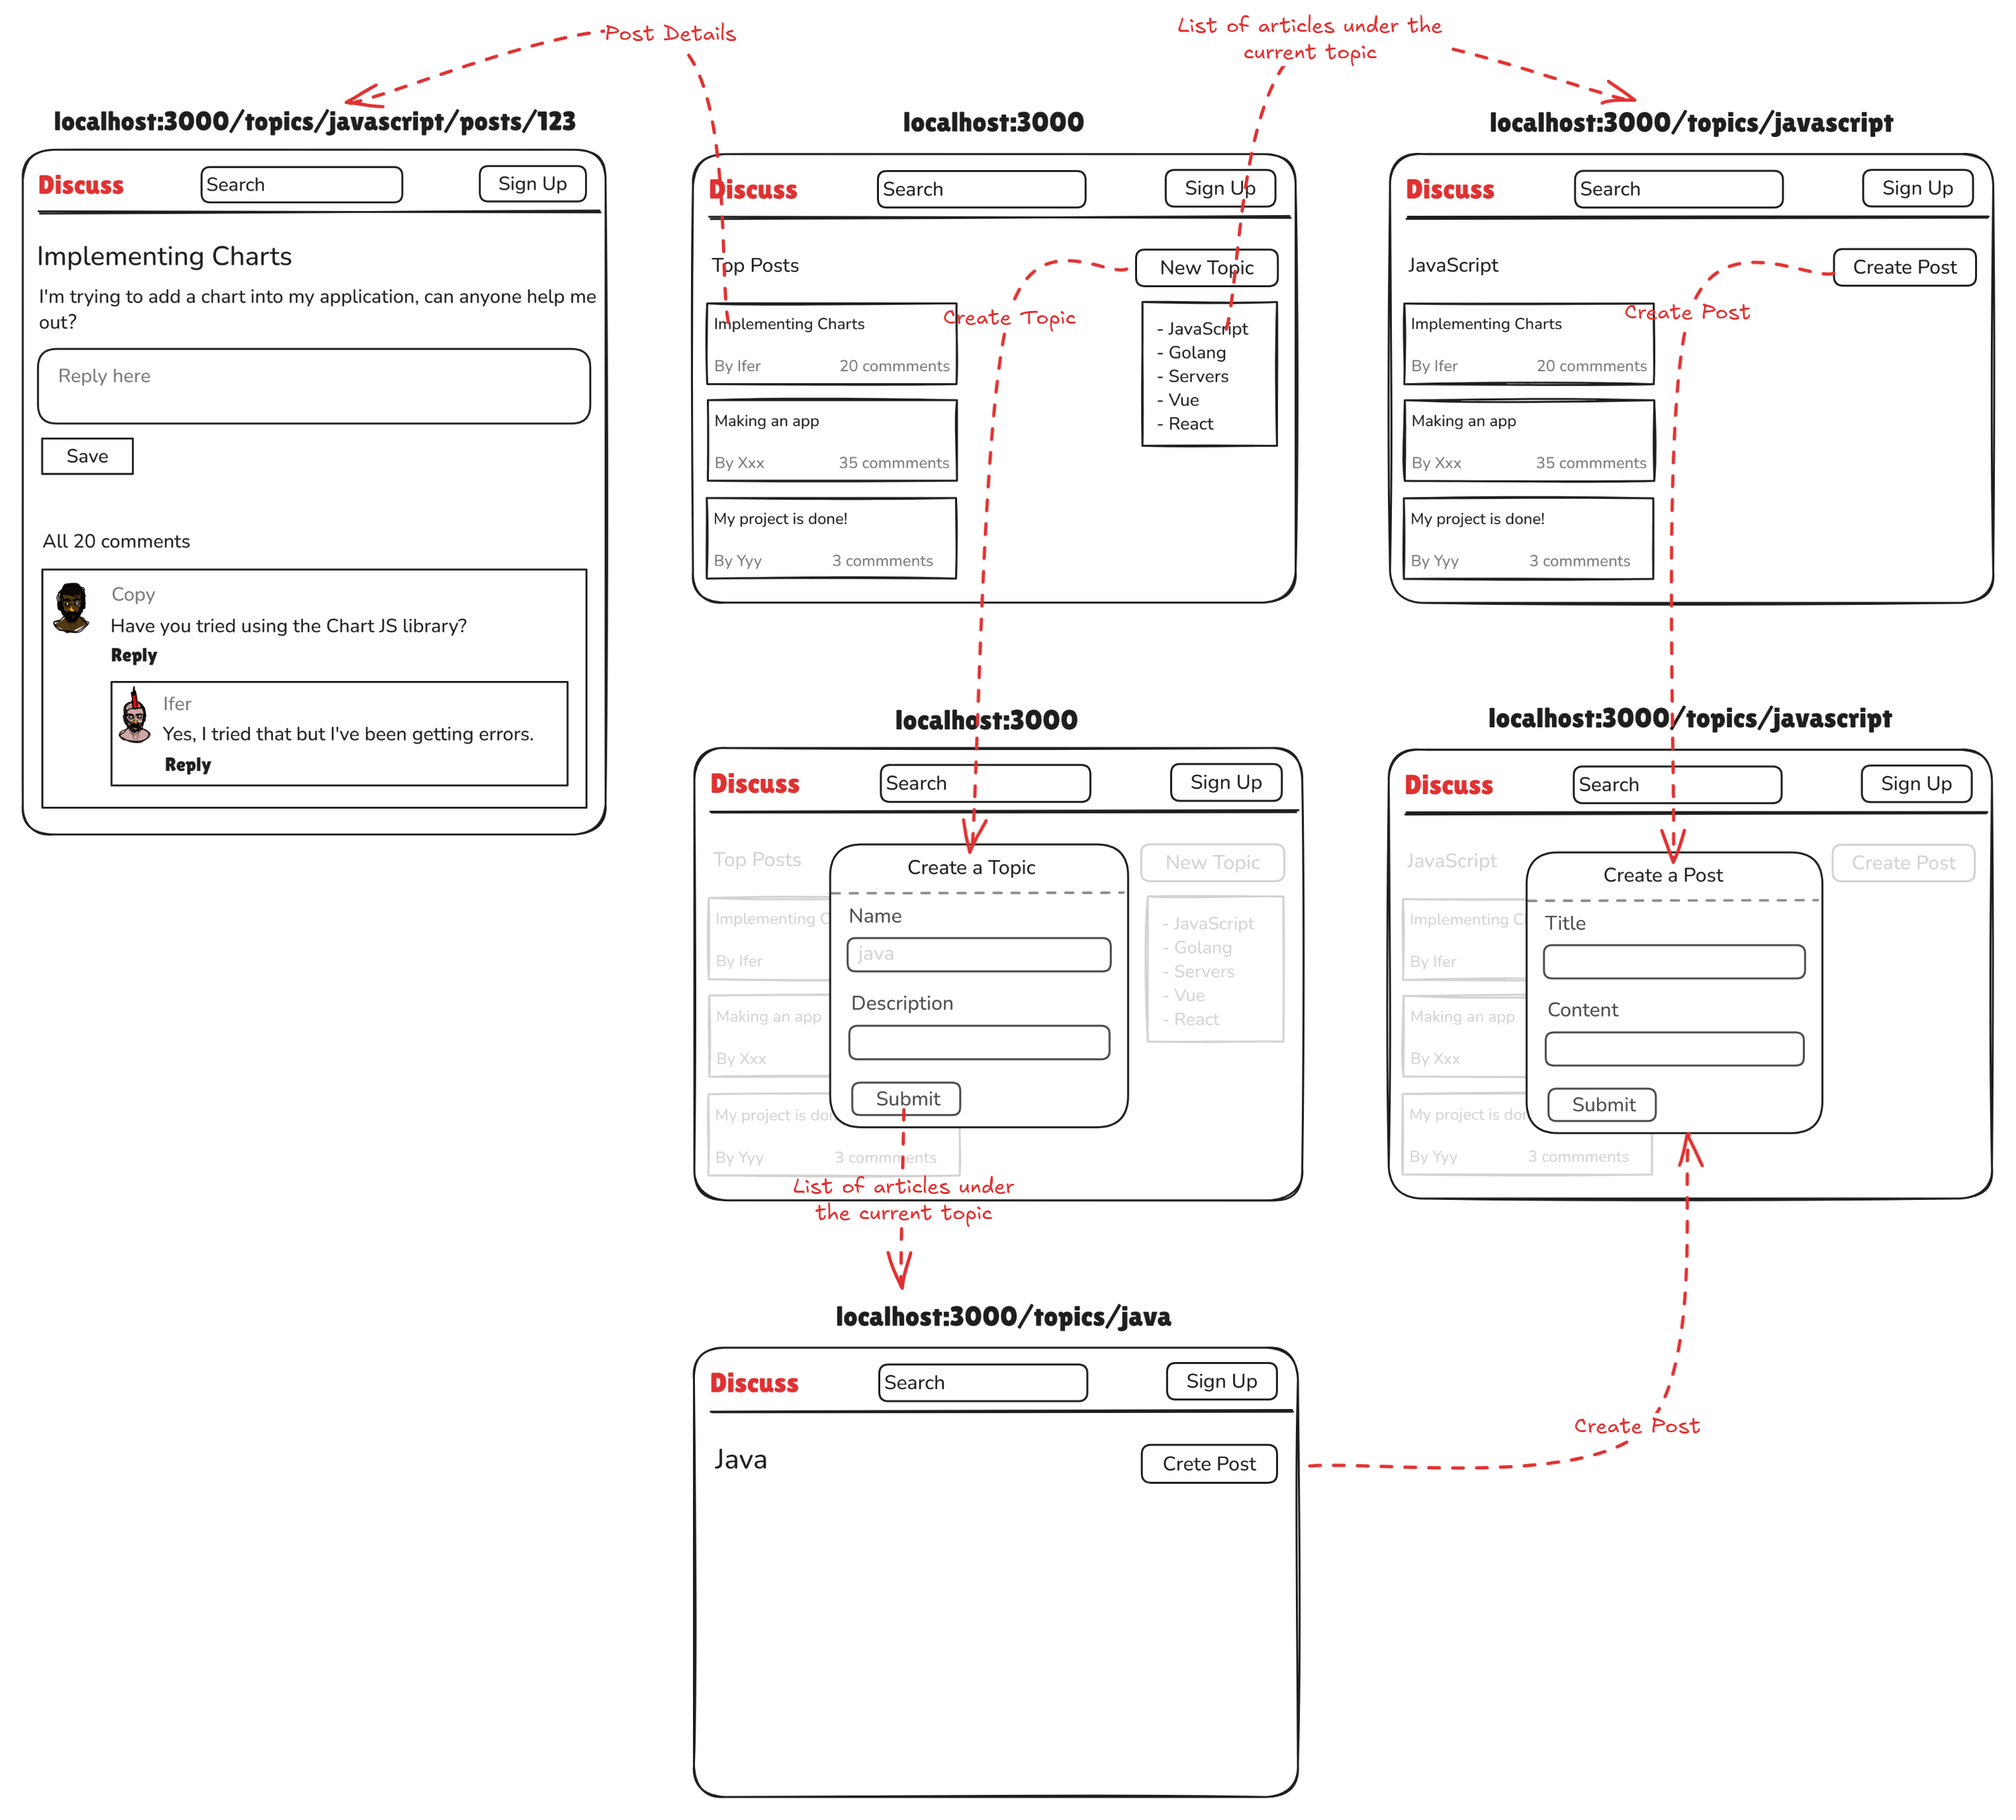
效果说明 1. 好,接下来的一段时间呢,咱会去完成这样一个论坛项目,我们通过这个项目呢咱可以创建话题,在新创建的话题下面呢创建帖子,然后就得到这样一个帖子详情页面,然后大家在这个页面可以对帖子进行评论或者说呢对别人的评论进行回复。
项目的效果啊大概是这样的,首先有一个公共的头部,它会存在于每一个页面,这个头部啊包含了帖子的搜索和登录功能。
2. 接下来是首页,首页的左侧是一个总的帖子列表,点击一个帖子,例如这一个,会跳转到帖子详情页面,我们可以在这个页面呢,对当前帖子进行评论,或者说啊对别人的评论进行回复。
3. 右侧有一个创建话题的按钮和一个话题列表,点击 New Topic 按钮创建话题,这时候会出现一个弹框,然后输入话题的名字和描述,点击 Submit,会跳转到当前新创建的话题页面,当然默认情况下它是空的,然后我们可以点击这个页面的 Create Post 按钮在当前话题下创建帖子,这时候又会出现创建帖子的弹框,我们可以输入帖子的标题和内容,点击 Submit,然后这儿呢就会出现新创建的帖子。
4. 除此之外呢,我们还可以查看已存在的,话题下面的帖子,例如我们可以回到首页,点击已存在 JavaScript 话题,这时候会跳转到当前话题下的帖子列表,同样可以通过 Create Post 按钮再次创建一个新的帖子。其实这个 JavaScript 和这个 Java 使用是同一个页面,只不过是不同的话题参数。
5. 所以最后看下来,咱这个项目啊总共会涉及到这么三个核心页面 ,分别是首页,帖子详情页,和每一个话题下的帖子列表页。
6. 做下来这个这个项目啊,会涉及到的技术有:首先是 NextJS,咱这一次呢会使用最新的版本,也就是 Next15,界面的话呢会借助 NextUI 和 TailwindCSS 去处理,数据库操作咱还是会使用 Prisma 和 SQLite,当然最后上线的时候你如果需要切换为其他数据库也是完全可以的,登录功能咱会使用主流的 NextAuth,咱会使用它现在最新的版本,名字叫做 Auth.js,当然在实际的开发过程中啊,其实还会涉及到其他各种各样的技术细节和问题,这个呢咱碰到的时候具体再说。
好啦,这是关于咱对后续项目的一个说明,谢谢大家。
创建项目 1 npx create-next-app@latest
如果控制台有报错,是我的浏览器插件 Trancy 导致的。
集成 NextUI 1. 第一步;
https://nextui.org/docs/frameworks/nextjs#manual-installation
1 npm i @nextui-org/react framer-motion
你使用的是 React19 的候选版本(19.0.0-rc-66855b96-20241106),@nextui-org/react 目前的 peer dependency 明确指定需要 react@>=18,且候选版本可能不在兼容范围内。
有两种解决办法:
1 2 npm install @nextui-org/react framer-motion --legacy-peer-deps
1 2 3 npm install react@18 react-dom@18 npm install @nextui-org/react framer-motion
2. 第二步;
1 2 3 4 5 6 7 8 9 10 11 12 13 14 15 16 17 18 import { nextui } from "@nextui-org/react" ;const config = { content : [ "./node_modules/@nextui-org/theme/dist/**/*.{js,ts,jsx,tsx}" , ], theme : { extend : {}, }, darkMode : "class" , plugins : [nextui ()], }; export default config;
3. 第三步;
…
4. global.css
1
2
3
@tailwind base;@tailwind components;@tailwind utilities;
5. src/app/page.tsx
1
2
3
4
5
6
7
8
9
import { Button } from "@nextui-org/button" ;export default function Page ( return ( <div > <Button > Click me</Button > </div > ); }
安装并配置 Auth.js 好,接下来咱首先做一下这个项目的登录功能,咱会借助 auth.js 这个包和 Github 做一个第三方登录,大概步骤应该有哪些呢?
第一步,安装 next-auth 并做基础的配置;
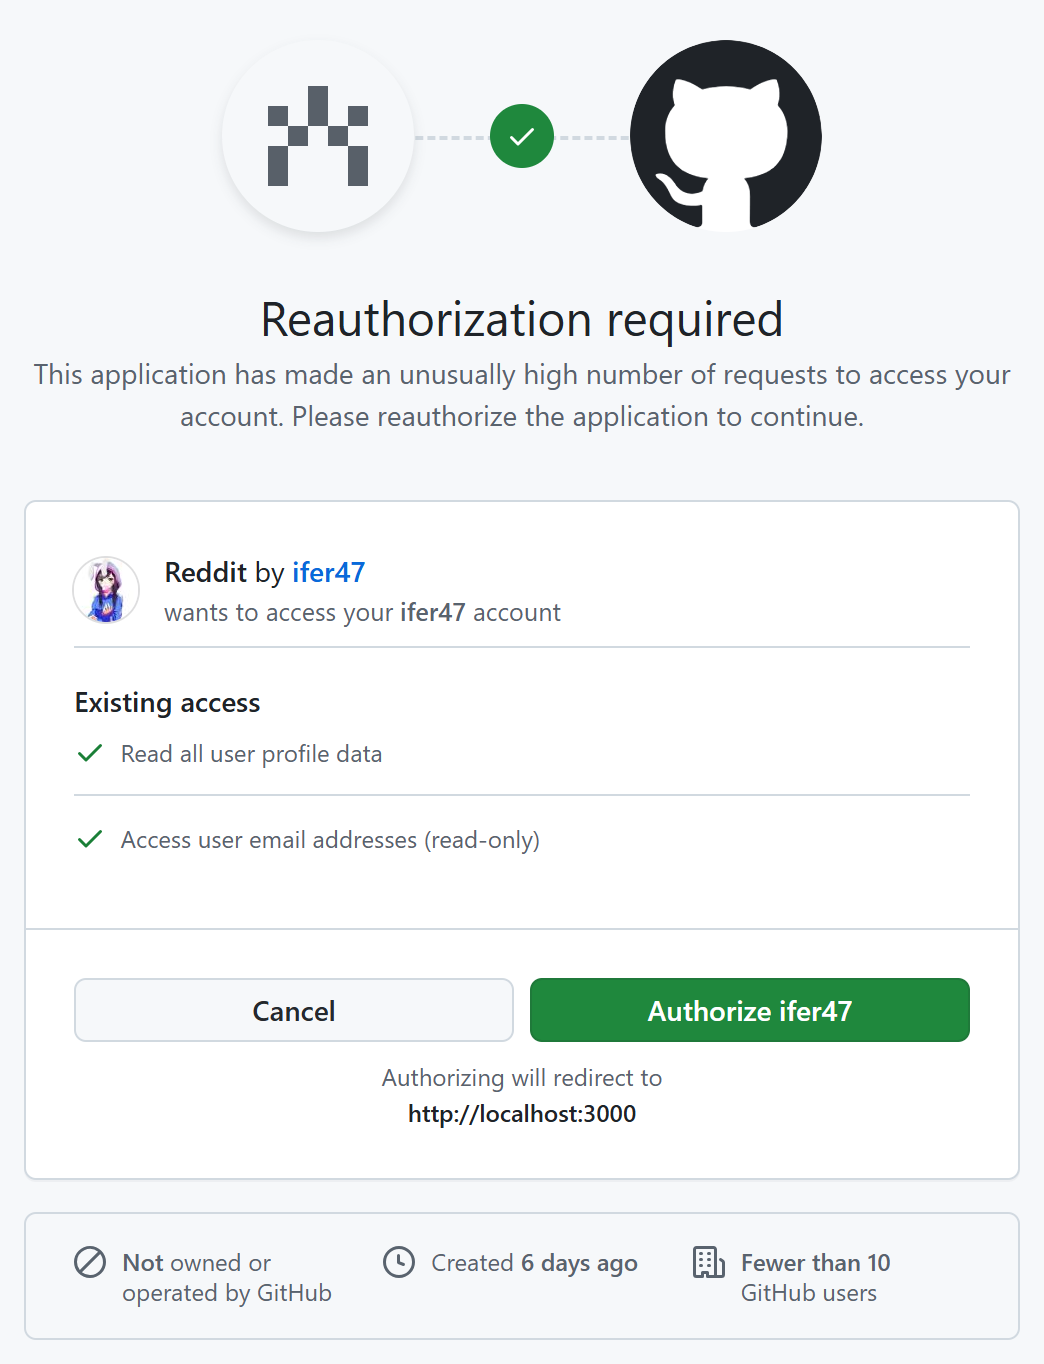
第二步呢,大家可以点一下左边的 OAuth,在这儿呢,选择一种或多种 OAuth 认证的方案,例如咱这儿选择的是 Github,它说呢,要去 Github 平台啊注册应用,并获取 CLIENT_ID 和 CLIENT_SECRET,然后再在咱自己的 Next.js 项目中做相应的配置就可以进行登录了;
当然这样做完之后,登录用户的信息并没有记录到咱自己项目的数据库当中,所以一般还需要进行第三个大的步骤,那就是借助官方提供的 Adapter,再结合 ORM 和数据库进行一些处理,目的呢就是存储第三方登录用户的信息到咱自己项目的数据库当中。
ok,大概就是这样一个操作,咱分别来做一下,首先看一下第一步,安装 auth.js 并做基础的配置。
https://authjs.dev/getting-started/installation
1 npm install next-auth@beta --legacy-peer-deps
生成密钥。
相关配置。
src/auth.ts
1
2
3
4
5
import NextAuth from "next-auth" ;export const { handlers, signIn, signOut, auth } = NextAuth ({ providers : [], });
app/api/auth/[…nextauth]/route.ts
1
2
import { handlers } from "@/auth" ; export const { GET , POST } = handlers;
src/middleware.ts
1 export { auth as middleware } from "@/auth" ;
Register OAuth App in GitHub’s dashboard https://authjs.dev/guides/configuring-github
获取 AUTH_GITHUB_ID 和 AUTH_GITHUB_SECRET。
github.com/settings/applications/new
1. Application name
2. Homepage URL
3. Application description
4. Authorization callback URL
1 http://localhost:3000/api/auth/callback/github
5. 得到 Client ID,然后 Generate a new client secret
.env.local
1
2
AUTH_GITHUB_ID=Ov23liPAFfOLgNfQj7yh AUTH_GITHUB_SECRET=19271be3c596f410a99aeddffc661b239c79f9c1
配置环境变量,.env.local
1
2
AUTH_GITHUB_ID = { CLIENT_ID };AUTH_GITHUB_SECRET = { CLIENT_SECRET };
配置 provider,src/auth.ts
1
2
3
4
5
6
import NextAuth from "next-auth" ;import GitHub from "next-auth/providers/github" ;export const { handlers, signIn, signOut, auth } = NextAuth ({ providers : [GitHub ], });
登录按钮,src/components/sign-button.tsx
1
2
3
4
5
6
7
8
9
10
11
12
13
14
import { signIn } from "@/auth" ;export default async function SignIn ( return ( <form action ={async () => { "use server"; await signIn("github"); }} > <button type ="submit" > Signin with GitHub</button > </form > ); }
退出按钮,src/components/signout-button.tsx
1
2
3
4
5
6
7
8
9
10
11
12
13
14
import { signOut } from "@/auth" ;export default function SignOut ( return ( <form action ={async () => { "use server"; await signOut(); }} > <button type ="submit" > Sign Out</button > </form > ); }
src/app/page.tsx
1
2
3
4
5
6
7
8
9
10
11
12
13
14
15
import React from "react" ;import SignButton from "@/components/sign-button" ;import { auth } from "@/auth" ;import SignOutButton from "@/components/signout-button" ;export default async function Page ( const session = await auth (); return ( <> <div > {session?.user ? JSON.stringify(session.user) : "未登录"}</div > <SignButton /> <SignOutButton /> </> ); }
特别注意:如果一切配置正确,出现错误,极可能是网络问题!连接的 Lenovo Connect(LTE)能正常 Google。
如果出现错误:TypeError: immutable,修改 src\app\api\auth[…nextauth]\route.ts 如下:
1
2
3
import { handlers } from "@/auth" ; export const { GET , POST } = handlers;
初始化 Prisma 和数据库 好,接下来我们使用官方的 Adapter 把第三方用户的登录信息持久话到我们项目的数据库中。
1. 初始化 Prisma 和 SQLite;
https://www.prisma.io/docs/getting-started/quickstart-sqlite
https://authjs.dev/getting-started/adapters/prisma
1
2
npm i prisma --save-dev --legacy-peer-deps npm install @prisma/client @auth/prisma-adapter --legacy-peer-deps
2. 初始化 Prisma 和 SQLite;
https://www.prisma.io/docs/getting-started/quickstart-sqlite
1 npx prisma init --datasource-provider sqlite
3. src/prisma.ts
1
2
3
4
5
6
7
import { PrismaClient } from "@prisma/client" ;const globalForPrisma = globalThis as unknown as { prisma : PrismaClient };export const prisma = globalForPrisma.prisma || new PrismaClient ();if (process.env .NODE_ENV !== "production" ) globalForPrisma.prisma = prisma;
4. src/auth.ts,格外小心,不要忘了 providers
1
2
3
4
5
6
7
8
9
import NextAuth from "next-auth" ;import { PrismaAdapter } from "@auth/prisma-adapter" ;import { prisma } from "@/prisma" ;import GitHub from "next-auth/providers/github" ;export const { handlers, auth, signIn, signOut } = NextAuth ({ adapter : PrismaAdapter (prisma), providers : [GitHub ], });
5. 定义 Schema;
https://authjs.dev/getting-started/adapters/prisma#schema
6. 生成数据库表和 Prisma 客户端;
每个迁移文件都包含对数据库结构的具体更改(如添加表、修改列、删除字段等)的 SQL 语句。通过这些文件,我们可以回溯历史,了解每次变更的具体内容和时间。
当然,使用迁移文件并不是必须的,你也可以不使用。
1 2 3 4 5 npx prisma db push npx prisma generate
碰到的问题 好,上一步咱完成了把第三方登录用户的信息存储到咱自己项目中的功能,但是你会发现这时候后端的控制台出现了一点问题,或者说出现了报错,那这个报错什么意思呢?
1. 如果你把这个错误信息啊,粘贴到 GPT 中啊会有这样一个答案,他说,是因为你在 Edge Runtime 中使用了 Prisma 相关的操作,嗯,听到这儿就有点蒙了,什么是 Edge Runtime?
ok,其实 Next.js 提供了两种用于渲染应用的运行时(runtime: 执行期间一组可用的库、API、和常规功能的集合)?
一种是 Nodejs Runtime,这是默认的运行时,在这个运行时中我们可以使用 Node.js API 和 Node 生态相关的包;
而另外一种正是 Edge Runtime,翻译过来叫边缘运行时,你可以先把它理解成是一个特殊的运行环境,这个运行环境呢,相比较 Node Runtime,会更加的轻量和高效,但是!它也有一些局限,例如它支持的 API 啊就比较有限,至于支持哪些 API 呢,官方这儿有一个详细的说明,大家下去以后可以大概看一眼,https://nextjs.org/docs/app/api-reference/edge
2. 这个时候有个注意点,就是咱现在 Next.js 项目中的 Middleware 文件啊,正是运行在 Edge runtime 的,而且它也只能运行在 Edge Runtime,关于这一点,官方同样也有说明,例如咱找到 Middleware 这个章节也给大家看一眼,https://nextjs.org/docs/app/building-your-application/routing/middleware#runtime
好,一般情况下呢,我们在 Middleware 中写的代码都没有问题,但是当我们在 Middleware 中碰到 Prisma 的时候,这个时候 Edge Runtime 就搞不定了,所以就出现了这个报错。
大家点开 middleware,再点开 auth 这个文件,会发现它里面确实涉及到了 Prisma 相关的操作。
3. 那么该如何解决这个问题呢?
第一种方式呢,大家可以想办法让 Edge Runtime 支持 Prisma 或者让 Prisma 兼容 Edge runtime,这就要看官方有没有提供相关的方案了。
第二种方式呢,咱干脆在 Middleware 中不要引入 Prisma,例如咱现在之所以要这样引,是为了得到 auth 对象以便后续的操作啊能用到这个对象,那 auth 对象是怎么来的呢?是不是通过调用 NextAuth 方法生成的呀,所以咱感觉可不可以直接在 middleware 中直接调用 NextAuth 方法生成 auth 对象,只不过这一次调用 NextAuth 方法的时候啊,咱不要 Adapter Prisma … 这些东西是不是就好了。感觉是可以的,事实上官方给我们提供的这个处理方式也正是这个原理,就是把 Edge runtime 兼容的配置与不兼容的分开处理,中间件仅导入或使用 Edge 兼容的部分。
ok,那咱就按照官方的说明啊再优化一下这个代码的写法。
OAuth2.0 授权流程 1 2 3 4 5 6 7 https://github.com/login/oauth/authorize? scope=read :user+user:email& response_type=code& client_id=Ov23liPAFfOLgNfQj7yh& redirect_uri=http://localhost:3000/api/auth/callback/github& code_challenge=CWpAgDAFHsmmcC-7hqywqb8MqWoCepeE_eUWJw4gcao& code_challenge_method=S256
服务端组件和客户端组件的登录/退出 好,前面咱完成了登录功能,默认情况下登录成功后会跳转到首页,如果你期望登录成功后跳转到其他界面可以这样写。
1 await signIn ("github" , { redirectTo : "/dashboard" });
如果想进行退出的处理,官方这儿也有说明,例如可以调用 signOut 方法,这个 SignOut 其实是 NextAuth 方法返回的,例如咱给大家尝试一下这个退出的功能。
src\components\signout-button.tsx
1 2 3 4 5 6 7 8 9 10 11 12 13 14 import { signOut } from "@/auth" ;export default function SignOutButton ( return ( <form action ={async () => { "use server"; await signOut(); }} > <button type ="submit" > Sign Out</button > </form > ); }
最后还有一个注意点,前面咱编写的登录和退出的操作都是在服务端组件进行的,如果是在客户端组件的话,写法上会有一些变化,官方这儿有代码举例,最主要的就是,这个 signIn 和 signOut 函数呢,是从 next-auth/react 中导过来的。咱同样通过代码给大家测试一下。
好啦,这是这节课咱给大家说的登录和退出功能的注意点,好,谢谢大家。
如何在客户端组件获取用户信息 src\components\client\user-info.tsx
1 2 3 4 5 6 7 8 9 10 11 12 13 14 15 "use client" ;import { useSession } from "next-auth/react" ;export default function UserInfoClient ( const session = useSession (); if (!session.data ?.user ) return null ; return ( <div > <p > {JSON.stringify(session.data)}</p > <img src ={session.data.user.image} alt ="User Avatar" /> </div > ); }
src/app/providers.tsx
1 2 3 4 5 6 7 8 9 10 11 12 "use client" ;import { NextUIProvider } from "@nextui-org/react" ;import { SessionProvider } from "next-auth/react" ;export function Providers ({ children }: { children: React.ReactNode } ) { return ( <SessionProvider > <NextUIProvider > {children}</NextUIProvider > </SessionProvider > ); }
表头界面 src\components\header.tsx
1 2 3 4 5 6 7 8 9 10 11 12 13 14 15 16 17 18 19 20 21 22 23 24 25 26 27 28 29 30 31 32 33 34 35 36 37 38 39 40 41 42 43 44 45 46 47 48 49 50 51 52 53 54 55 import { auth } from "@/auth" ;import { Navbar , NavbarBrand , NavbarContent , NavbarItem } from "@nextui-org/navbar" ;import { Avatar , Input } from "@nextui-org/react" ;import { Button } from "@nextui-org/react" ;import { ReactNode } from "react" ;export const AcmeLogo = ( return ( <svg fill ="none" height ="36" viewBox ="0 0 32 32" width ="36" > <path clipRule ="evenodd" d ="M17.6482 10.1305L15.8785 7.02583L7.02979 22.5499H10.5278L17.6482 10.1305ZM19.8798 14.0457L18.11 17.1983L19.394 19.4511H16.8453L15.1056 22.5499H24.7272L19.8798 14.0457Z" fill ="currentColor" fillRule ="evenodd" /> </svg > ); }; export default async function Header ( const session = await auth (); let authContent : ReactNode ; if (session?.user ) { authContent = <Avatar src ={session.user.image || "https: //avatars.githubusercontent.com /u /172476270 ?s =40&v =4 "} /> } else { authContent = ( <> <NavbarItem > <Button type ="submit" color ="secondary" variant ="bordered" > Sign In </Button > </NavbarItem > <NavbarItem > <Button type ="submit" color ="secondary" > Sign Up </Button > </NavbarItem > </> ); } return ( <Navbar className ="border-b-1 border-gray-200" > <NavbarBrand > <AcmeLogo /> <p className ="font-bold text-inherit" > DISCUSS</p > </NavbarBrand > <NavbarContent className ="hidden sm:flex gap-4" justify ="center" > <NavbarItem > <Input /> </NavbarItem > </NavbarContent > <NavbarContent justify ="end" > {authContent}</NavbarContent > </Navbar > ); }
完善登录和退出 src/actions/sign-in.ts
1 2 3 4 5 6 7 "use server" ;import * as auth from "@/auth" ;export async function signIn ( return auth.signIn ("github" ); }
src/actions/sign-out.ts
1 2 3 4 5 6 7 "use server" ;import * as auth from "@/auth" ;export async function signOut ( return auth.signOut (); }
src/actions/index.ts
1 2 export { signIn } from "./sign-in" ;export { signOut } from "./sign-out" ;
src/components/header.tsx
1 2 3 4 5 6 7 8 9 10 11 12 13 14 15 16 17 18 19 20 21 22 23 24 25 26 27 28 29 30 31 32 33 34 35 36 37 38 39 40 41 42 43 44 45 46 47 48 49 50 51 52 53 54 55 56 57 58 59 60 61 62 63 64 65 66 67 68 69 70 import { auth } from "@/auth" ;import { Navbar , NavbarBrand , NavbarContent , NavbarItem , Button , Input , Avatar , Popover , PopoverTrigger , PopoverContent } from "@nextui-org/react" ;import * as actions from "@/actions" ;export const AcmeLogo = ( return ( <svg fill ="none" height ="36" viewBox ="0 0 32 32" width ="36" > <path clipRule ="evenodd" d ="M17.6482 10.1305L15.8785 7.02583L7.02979 22.5499H10.5278L17.6482 10.1305ZM19.8798 14.0457L18.11 17.1983L19.394 19.4511H16.8453L15.1056 22.5499H24.7272L19.8798 14.0457Z" fill ="currentColor" fillRule ="evenodd" /> </svg > ); }; export default async function Header ( const session = await auth (); let authContent : React .ReactNode ; if (session?.user ) { authContent = ( <Popover placement ="bottom" > <PopoverTrigger > <Avatar src ={session.user.image || "https: //i.pravatar.cc /150 ?u =a042581f4e29026024d "} /> </PopoverTrigger > <PopoverContent > <form action ={actions.signOut} className ="p-4" > <Button type ="submit" > Sign Out</Button > </form > </PopoverContent > </Popover > ); } else { authContent = ( <> <NavbarItem className ="hidden lg:flex" > <form action ={actions.signIn} > <Button type ="submit" color ="secondary" href ="#" variant ="bordered" > Sign In </Button > </form > </NavbarItem > <NavbarItem > <form action ={actions.signIn} > <Button type ="submit" color ="secondary" href ="#" > Sign Up </Button > </form > </NavbarItem > </> ); } return ( <Navbar className ="border-b-1 border-gray-200" > <NavbarBrand > <AcmeLogo /> <p className ="font-bold text-inherit" > DISCUSS</p > </NavbarBrand > <NavbarContent className ="hidden sm:flex gap-4" justify ="center" > <NavbarItem > <Input /> </NavbarItem > </NavbarContent > <NavbarContent justify ="end" > {authContent}</NavbarContent > </Navbar > ); }
优化打包性能 好,接下来咱继续优化现有的代码,首先呢,咱把首页之前测试的内容啊全部清空,只保留一个 Hello World,接下来找到 user-info 这两个组件,就是这个 img 的值啊可能为空,所以咱后面给一个默认的图片地址,否则待会项目打包的时候会有报错,https://i.pravatar.cc/150?u=a042581f4e29026024d,/src/components/header.tsx,还有 header 组件当中有一些没有用到的方法咱也给他删掉,否则同样会影响接下来的打包?
ok,改造完毕之后呢,给大家看一下现在打包的效果,执行 npm run build。
这个时候你会发现呢?首页竟然是动态渲染的,甚至连 404 页面也是动态的,明明咱这个首页啊只有这么一点文字,按道理来说前面应该是个圈,应该是静态的渲染才对?
那有同学可能会说,老师管他什么渲染呢,我怼出来不久行了,其实这样不好!
因为现在来说这个首页页面就应该是静态渲染,走完全路由缓存,这样才是性能最好的,所以咱有必要研究一下为什么会这样?
其实是因为啊,我们在 Root Layout 里面导入了 Header 组件,而 Header 组件当中使用了 auth 这个方法,而 auth 方法内部其实是用到了 Cookie 相关的操作,大家还记得吗,咱前面给大说过,如果使用了 cookies 这些动态方法,就会导致页面啊变成动态的,再给大家会议一下问答,例如在这儿官方是有说明的。
我们在 Root Layout 里面引用了这个 Header 组件,其实会影响到每一个页面,所以以后每一个 页面都会是动态的,那么大家可以想一下,我们仅仅为了使用了身份验证就完全放弃了静态渲染,那这个代价啊也太大了。
那该怎么办呢?
ok,前面咱给大家说过这样一个知识点,就是获取登录后的认证信息啊其实有两种方式,一种就是调用 auth 方法,其实还有一种方式就是在客户端组件调用 useSession,我告诉大家,而这个 useSession 内部啊并不会涉及到 Cookie 之类的操作,他就是普通的向后端发请求得到信息的,所以咱可以再抽离一个客户端组件,这个客户端组件呢,专门用来处理获取用户信息的逻辑就好啦。
ok,咱具体操作一下把。
src\components\header-auth.tsx
1 2 3 4 5 6 7 8 9 10 11 12 13 14 15 16 17 18 19 20 21 22 23 24 25 26 27 28 29 30 31 32 33 34 35 36 37 38 39 40 41 42 43 44 45 46 47 48 49 50 51 52 53 54 55 56 57 "use client" ;import * as actions from "@/actions" ;import { NavbarItem , Button , Avatar , Popover , PopoverTrigger , PopoverContent } from "@nextui-org/react" ;import { useSession } from "next-auth/react" ;export const AcmeLogo = ( return ( <svg fill ="none" height ="36" viewBox ="0 0 32 32" width ="36" > <path clipRule ="evenodd" d ="M17.6482 10.1305L15.8785 7.02583L7.02979 22.5499H10.5278L17.6482 10.1305ZM19.8798 14.0457L18.11 17.1983L19.394 19.4511H16.8453L15.1056 22.5499H24.7272L19.8798 14.0457Z" fill ="currentColor" fillRule ="evenodd" /> </svg > ); }; export default function Header ( const { data : session } = useSession (); let authContent : React .ReactNode ; if (session?.user ) { authContent = ( <Popover placement ="bottom" > <PopoverTrigger > <Avatar src ={session.user.image || "https: //i.pravatar.cc /150 ?u =a042581f4e29026024d "} /> </PopoverTrigger > <PopoverContent > <form className ="p-4" action ={actions.signOut} > <Button type ="submit" > 退出</Button > </form > </PopoverContent > </Popover > ); } else { authContent = ( <> <NavbarItem className ="hidden lg:flex" > <form action ={actions.signIn} > <Button type ="submit" color ="secondary" href ="#" variant ="bordered" > Sign In </Button > </form > </NavbarItem > <NavbarItem > <form action ={actions.signIn} > <Button type ="submit" color ="secondary" href ="#" > Sign Up </Button > </form > </NavbarItem > </> ); } return authContent; }
src\components\header.tsx
1 2 3 <NavbarContent justify="end" > <HeaderAuth /> </NavbarContent >
添加头像加载状态 src\components\header-auth.tsx
https://next-auth.js.org/getting-started/client
1 2 3 4 5 6 7 export default function HeaderAuth ( const { data : session, status } = useSession (); let authContent : React .ReactNode ; if (status === "loading" ) { authContent = null ; } }
src\app\page.tsx
1 2 3 4 5 6 7 8 9 10 11 12 13 import TopicCreateForm from "@/components/topics/topic-create-form" ;export default function Page ( return ( <div className ="flex justify-between" > <div > <h1 className ="text-xl m-2" > Top Posts</h1 > </div > <div > <TopicCreateForm /> </div > </div > ); }
src\components\topics\topic-create-form.tsx
1 2 3 4 5 6 7 8 9 import { Button } from "@nextui-org/react" ;export default function TopicCreateForm ( return ( <Button color ="secondary" variant ="bordered" > Create a Topic </Button > ); }
layout.tsx
1 2 3 4 5 6 7 8 9 10 11 12 13 14 15 16 17 export default function RootLayout ({ children, }: Readonly<{ children: React.ReactNode; }> ) { return ( <html lang ="en" > <body className ={ `${geistSans.variable } ${geistMono.variable } antialiased `}> <Providers > <Header /> <div className ="max-w-[1024px] mx-auto px-6 pt-5" > {children}</div > </Providers > </body > </html > ); }
准备创建话题的弹框 1 2 3 4 5 6 7 8 9 10 11 12 13 14 15 16 17 18 19 20 21 22 23 24 import { Button , Popover , PopoverTrigger , PopoverContent , Input , Textarea } from "@nextui-org/react" ;import * as actions from "@/actions" ;export default function TopicCreateForm ( return ( <Popover placement ="left" > <PopoverTrigger > <Button color ="secondary" variant ="bordered" > Create a Topic </Button > </PopoverTrigger > <PopoverContent > <form action ={actions.createTopic} > <div className ="flex flex-col gap-4 p-4 w-80" > <h3 className ="text-lg" > Create a Topic</h3 > <Input name ="name" label ="Name" labelPlacement ="outside" placeholder ="Name" /> <Textarea name ="description" label ="Description" labelPlacement ="outside" placeholder ="Describe your topic" /> <Button type ="submit" > Submit</Button > </div > </form > </PopoverContent > </Popover > ); }
src\actions\create-topic.ts
1 2 3 4 5 6 7 "use server" ;export async function createTopic (formData: FormData ) { const name = formData.get ("name" ); const description = formData.get ("description" ); console .log (name, description); }
src\actions\index.ts
1 2 3 export { signIn } from "./sign-in" ;export { signOut } from "./sign-out" ;export { createTopic } from "./create-topic" ;
验证接收到的数据 src\actions\create-topic.ts
1 2 3 4 5 6 7 8 9 10 11 12 13 14 15 16 17 18 19 20 21 22 23 24 "use server" ;import { z } from "zod" ;const createTopicSchema = z.object ({ name : z .string () .min (3 ) .regex (/^[a-z-]+$/ , { message : "Must be lowercase letters or dashes without spaces" , }), description : z.string ().min (10 ), }); export async function createTopic (formData: FormData ) { const name = formData.get ("name" ); const description = formData.get ("description" ); const result = createTopicSchema.safeParse ({ name, description, }); if (!result.success ) { console .log (result.error .flatten ().fieldErrors ); } }
useActionState src\actions\create-topic.ts
1 2 3 4 5 6 7 8 9 10 11 12 13 14 15 16 17 18 19 20 21 22 23 24 25 26 27 28 29 30 31 32 33 34 35 36 37 38 39 "use server" ;import { z } from "zod" ;interface CreateTopicFormState { errors : { name?: string []; description?: string []; }; } const createTopicSchema = z.object ({ name : z .string () .min (3 ) .regex (/^[a-zA-Z0-9_]+$/ , { message : "Name must be at least 3 characters long and contain only letters, numbers, and underscores" , }), description : z.string ().min (10 ).max (4747 ), }); export async function createTopic (prevState: CreateTopicFormState, formData: FormData ) { const name = formData.get ("name" ); const description = formData.get ("description" ); const result = createTopicSchema.safeParse ({ name, description, }); if (!result.success ) { return { errors : result.error .flatten ().fieldErrors , }; } return { errors : {}, }; }
src\components\topic-create-form.tsx
1 2 3 4 5 6 7 8 9 10 11 12 13 14 15 16 17 18 19 20 21 22 23 24 25 26 27 28 29 30 31 32 33 34 35 36 37 38 39 40 41 42 43 "use client" ;import { Button , Popover , PopoverTrigger , PopoverContent , Input , Textarea } from "@nextui-org/react" ;import * as actions from "@/actions" ;import { useActionState } from "react" ;export default function TopicCreateForm ( const [state, formAction] = useActionState (actions.createTopic , { errors : {}, }); return ( <Popover placement ="left" > <PopoverTrigger > <Button color ="secondary" variant ="bordered" > Create a Topic </Button > </PopoverTrigger > <PopoverContent > <form action ={formAction} > <div className ="flex flex-col gap-4 p-4 w-80" > <h3 className ="text-lg" > Create a Topic</h3 > <Input name ="name" label ="Name" labelPlacement ="outside" placeholder ="Name" isInvalid ={!!state.errors.name} errorMessage ={state.errors.name?.join( ", ")} /> <Textarea name ="description" label ="Description" labelPlacement ="outside" placeholder ="Describe your topic" isInvalid ={!!state.errors.description} errorMessage ={state.errors.description?.join( ", ")} /> <Button type ="submit" > Submit</Button > </div > </form > </PopoverContent > </Popover > ); }
解决提交数据时表单重置的问题 src\components\topics\topic-create-form.tsx
https://github.com/facebook/react/issues/29034#issuecomment-2143595195
https://nextjs.org/docs/app/api-reference/components/form#caveats
https://www.w3.org/WAI/ARIA/apg/patterns/landmarks/examples/form.html
NextUI 组件的坑 好,接下来咱再解决一个 Bug,先给大家演示一下这个 Bug 的触发流程。例如我们点击创建话题的按钮,先填写不符合规则的信息,然后点击提交按钮触发错误校验,没有问题,好接下来我继续输入复合规则的内容,再次点击 Submit,这个时候应该来说啊,上一次的错误校验应该消失,注意我点击,你会发现界面好像并没有什么变化,这并不是我们期望的。
产生这个问题的原因啊,是因为有一些 JS 的校验逻辑和 HTML Input 框原生的数据校验产生了冲突,其实这个时候连 form 的 onSubmit 事件都没有触发?
那么如何解决呢?
好,既然咱知道了是 JS 的校验和 form 原生的校验产生冲突导致的,所以咱可以关闭 form 原生的校验啊即可。
如何关闭呢,这个时候我们只需要给 form 元素添加一个 noValidate 属性,表示啊,提交表单时关闭 form 当中的元素校验。
当然还有其他的一些处理方式,例如大家可以尝试把这里的原生 form 标签改成 nextUI 提供的 Form 组件,或者说把下面 Input 或 Textarea 组件替换成原生的 input 或 textarea 标签,应该来说问题也可以得到解决。
1 <form onSubmit={handleSubmit} noValidate></form>
1 2 <Form onSubmit={handleSubmit} validationBehavior="aria" ></Form >
最后咱再优化一个小的细节,就是前面咱添加的这个 loading 效果,当时咱是自己网上找的 tailwind 样式,其实 NextUI 提供的就有一个叫做 Spinner 的组件,所以咱在这儿啊还是改为 UI 框架自带的会比较好一些。
src\components\header-auth.tsx
1 authContent = <Spinner size="sm" color="secondary" />
提交话题时,用户未登录给出提示 提交话题时,如果用户未登录,则应给出提示。
src\actions\create-topic.ts
1 2 3 4 5 6 7 8 9 10 11 12 13 14 15 16 17 18 19 20 21 22 23 24 25 26 27 28 29 30 31 32 33 34 35 36 37 38 39 40 41 42 43 44 45 46 47 48 49 50 51 "use server" ;import { auth } from "@/auth" ;import { z } from "zod" ;interface CreateTopicFormState { errors : { name?: string []; description?: string []; _form?: string []; }; } const createTopicSchema = z.object ({ name : z .string () .min (3 ) .regex (/^[a-zA-Z0-9_]+$/ , { message : "Name must be at least 3 characters long and contain only letters, numbers, and underscores" , }), description : z.string ().min (10 ).max (4747 ), }); export async function createTopic (prevState: CreateTopicFormState, formData: FormData ): Promise <CreateTopicFormState > { const name = formData.get ("name" ); const description = formData.get ("description" ); const result = createTopicSchema.safeParse ({ name, description, }); if (!result.success ) { return { errors : result.error .flatten ().fieldErrors , }; } const session = await auth (); if (!session || !session.user ) { return { errors : { _form : ["You must be signed in to do this." ], }, }; } return { errors : {}, }; }
src\components\topics\topic-create-form.tsx
1 2 3 4 5 6 7 8 9 10 11 12 13 14 15 16 17 18 19 20 21 22 23 24 25 26 27 28 29 30 31 32 33 34 35 36 37 38 39 40 41 42 43 44 45 46 47 48 49 50 51 52 53 54 "use client" ;import { Button , Popover , PopoverTrigger , PopoverContent , Input , Textarea , Chip } from "@nextui-org/react" ;import * as actions from "@/actions" ;import React , { startTransition, useActionState } from "react" ;export default function TopicCreateForm ( const [state, formAction] = useActionState (actions.createTopic , { errors : {}, }); function handleSubmit (event: React.FormEvent<HTMLFormElement> ) { event.preventDefault (); const formData = new FormData (event.target as HTMLFormElement ); startTransition (() => formAction (formData)); } return ( <Popover placement ="left" > <PopoverTrigger > <Button color ="secondary" variant ="bordered" > Create a Topic </Button > </PopoverTrigger > <PopoverContent > <form onSubmit ={handleSubmit} noValidate > <div className ="flex flex-col gap-4 p-4 w-80" > <h3 className ="text-lg" > Create a Topic</h3 > <Input name ="name" label ="Name" labelPlacement ="outside" placeholder ="Name" isInvalid ={!!state.errors.name} errorMessage ={state.errors.name?.join( ", ")} /> <Textarea name ="description" label ="Description" labelPlacement ="outside" placeholder ="Describe your topic" isInvalid ={!!state.errors.description} errorMessage ={state.errors.description?.join( ", ")} /> {/* #4 */} {state.errors._form ? ( <Chip variant ="bordered" radius ="sm" className ="max-w-full" > {state.errors._form.join(", ")} </Chip > ) : null} <Button type ="submit" > Submit</Button > </div > </form > </PopoverContent > </Popover > ); }
创建话题 Schema 好,接下来我们编写一下关于创建话题的 Schema,Schema 就是和数据库中啊,表的映射关系,有了 Schema 之后呢,我们就可以根据 Schema 创建数据库表,也可以根据 Schema 创建操作数据库表的客户端。
这时候我们打开 prisma/schema.prisma,先编写创建话题的 Schema,model Topic,其中 Topic 会被映射为数据库中表的名字,接下来大括号,里面可以写一些字段信息,每一个字段信息呢有三大部分组成,分别是字段名称,字段类型和字段属性。
例如这个 Topic 应该有一个 id 字段,这个 id 就是字段名称,字段类型呢是 String,接下来我们再编写这个 id 字段的属性,字段属性一般以 @ 符号开头,例如 @id,表示这个 id 字段是主键,既 PRIMARY KEY,一个字段的属性可以有多个,例如我们再写一个 @default() 表示默认值,默认是什么呢?里面可以加上参数,例如 cuid(),表示会基于这个 cuid 规范生成唯一标识符。
1 2 3 4 5 6 7 model Topic { id String @id @default(cuid()) name String @unique description String createdAt DateTime @default(now()) updatedAt DateTime @updatedAt }
好接下来我们再写一个话题下面的相关的帖子的 Schema。
1 2 3 4 5 6 7 8 model Post { id String @id @default(cuid()) title String content String createdAt DateTime @default(now()) updatedAt DateTime @updatedAt }
好,继续,我们编写帖子下面的评论 Schema。
1 2 3 4 5 6 model Comment { id String @id @default(cuid()) content String createdAt DateTime @default(now()) updatedAt DateTime @updatedAt }
Schema 之间的关系 好,前面我们创建好了 Topic、Post 和 Comment 模型,接下来我们还需要表示一下现有模型之间的关系是怎样的。这几个模型分别是 User 和 Topic、User 和 Post、User 和 Comment,其实他们之间啊都是一对多的关系,也就是一个用户啊,可能会创建多个话题,一个用户可能会发表多个帖子,一个用户可能会产生多条评论。
那么在 Prisma 中,如何通过代码的方式来表示这种一对多的关系呢,好我们打开 VSCode 给大家演示一下。首先找到 User 模型这儿,例如我们先写个字段叫 topics,后面可以跟上 Topic 模型,数组,这就表示一个用户可以创建多个话题,然后是 posts,对应的值是 Post 数组 [],表示一个用户可以发表多个帖子,再然后是 comments,它对应的值是 Comment 数组 [],表示一个用户又可以发表多条评论。
1 2 3 4 5 6 model User { # ... topics Topic [] posts Post [] comments Comment [] }
到这还没完,我们还需要分别找到 Topic、Post 和 Comment 这三个模型,让他们和 User 也 产生关联,这时候就需要通过这三个模型的外键和 User 模型的主键进行绑定,具体该如何去操作呢?一种快捷的方式,大家可以按一下 alt + shift + f,格式化的同时,这三个模型和 User 的关联关系也会自动生成,大家注意看…
当然咱这第一次,我还是手动的给大家写一下,它的语法格式是这样的:
1 字段名称 字段类型,通常是目标模型的名称 @relation(fields: [当前模型的外键], references: [目标模型的主键])
例如我们可以先在 Topic 模型中建一个 user 字段,它的字段类型通常是目标模型,这儿就是 User 模型,然后通过 @relation() fields,当前模型的外键 ,这儿可以写个 userId,同时我们也要单独加上 userId 这个外键字段,再然后写 references,目标模型的主键 ,对于这儿说的就是 User 模型的 id,最后后面可以再写一个 onDelete:Cascade,这句话表示当目标模型 User 中的某条记录被删除时,所有关联该记录的 Topic 记录也会被自动删除。
1 2 3 4 5 6 7 model Topic { # ... # 字段名称 字段类型,通常是目标模型的名称 @relation (fields : [当前模型的外键], references : [目标模型的主键], onDelete : Cascade ) user User @relation (fields : [userId], references : [id], onDelete : Cascade ) # 例如,如果 userId 是 123 ,那么这个话题就关联到了 User 模型中 id 为 123 的用户 userId String }
ok,另外两个模型 Post 和 Comment 也是同样的写法,我们复制一下上面的代码即可。
1 2 3 4 model Post { user User @relation (fields : [userId], references : [id], onDelete : Cascade ) userId String }
1 2 3 4 5 model Comment { # ... user User @relation (fields : [userId], references : [id], onDelete : Cascade ) userId String }
好,用户和这三个模型之间的一对多的关系的表示到这咱就写完了,其实最开始咱粘贴过来的认证信息相关的 Schema,也用到了咱现在这样一个语法,例如用户 User 和 Account 之间也是一对多的关系,因为一个用户可以有多个账户,例如 Github 认证的账号,或者说 Google 认证的账号,你会发现别人也是通过这样一种方式来实现的。
ok,接下来其实还有一些一对多的关系我们继续通过代码表示出来,其实 Topic 和 Post、Post 和 Comment 之间也是一对多的关系,即一个话题下面可以有多个帖子,一个帖子下面呢又可以有多条评论,ok,根据刚才的学习我们继续编写代码。
1 2 3 model Topic { posts Post [] }
1 2 3 4 5 model Post { # ... topic Topic @relation (fields : [topicId], references : [id], onDelete : Cascade ) topicId String }
1 2 3 4 model Post { # ... comments Comment [] }
1 2 3 4 5 model Comment { # ... post Post @relation (fields : [postId], references : [id], onDelete : Cascade ) postId String }
ok,这是本节课咱给大家说的关于 Prisma 中该如何表示这种一对多的数据关系。即用户和话题、用户和帖子、用户和评论,话题和帖子、帖子和评论。
自关联 接下来我们继续完善一下关于评论的 Schema,这里我们需要用到自关联,自关联指的是自身模型中的一个字段可以关联到自身模型,通过自关联,可以实现表中的一条记录引用自身表中的其他记录,从而形成一种树形结构的层级关系。
例如一条评论可以有一条父评论,我们用 parent 字段表示,它的类型就是当前模型本身,即 Comment,当然也可能没有父评论,所以后面加个问号表示可选。
一条评论也可以有多条子评论,我们可以用 children 字段表示,既然是多条子评论,所以它的类型是 Comment 组成的数组,如果没有子评论,这儿默认会是一个空数组。
1 2 parent Comment ? children Comment []
接下来要想形成评论自关联的关系,我们还需要在 parent 和 children 这儿写 @relation,当一个模型中存在多个字段指向同一个目标模型时,我们一般需要给 @relation 的第一个参数指定关系名称,例如我们这儿叫 Comments,这个关系名称啊叫什么无所谓,只要两个保持一致即可,它的作用是用来帮助 Prisma 区分每个字段属于哪个关系,然后再往后才是 fields,当前模型的外键,references,目标模型的主键,然后是 onDelete …
1 2 3 4 5 model Comment { parent Comment ? @relation ("Comments" , fields : [parentId], references : [id], onDelete : Cascade ) parentId String ? children Comment [] @relation ("Comments" ) }
好了,这样的话我们就把这个评论模型的自关联关系也给声明好了,后面我们只需要编写相关业务代码就好啦。
当然最后,我们还需再做一件事情,就是把当前的 Schema 同步到数据库,还有根据当前的 Schema 生成 Prisma 客户端,这两个命令分别是:
1 npx prisma db push && npx prisma generate
ok,打开数据库看一下,和 Schema 相对应的表结构都已经生成啦,好啦,本节关于评论模型的自关联关系的声明咱就先说到这儿,谢谢大家。
添加话题功能 How to get session.user.id from auth.js
https://authjs.dev/guides/extending-the-session#with-jwt https://authjs.dev/getting-started/typescript https://github.com/nextauthjs/next-auth/issues/7132
src\actions\create-topic.ts
1 2 3 4 5 6 7 await prisma.topic .create ({ data : { name : result.data .name , description : result.data .description , userId : session.user .id !, }, });
session.user.id 可能是 undefined,我们打印看一下这个的输出情况 … 打开后端控制台会发现确实是 undefined,如何处理呢?
实际上来说这个时候我们需要手动的扩展 session 上的内容,打开 Auth.js 的官方文档,官方这儿有相关说明,他说默认情况下 … token 和 session 并没有这个 id 属性,这个时候咱可以通过这种方式来扩展它。
粘过来之后有一些 TS 的类型错误,这个时候你可以根据官方的说明来拓展类型,我这儿就是简单一些,直接通过断言去处理了,可以 as string。
src/auth.ts
1 2 3 4 5 6 7 8 9 10 11 12 13 14 15 16 export const { handlers, auth, signIn, signOut } = NextAuth ({ callbacks : { jwt ({ token, user } ) { if (user) { token.id = user.id ; } return token; }, session ({ session, token } ) { session.user .id = token.id as string ; return session; }, }, });
ok,这样做完之后,我们再看一下这儿是否有 id 的输出 … 会发现这儿已经进行了输出,接下来我们打开下面的注释看能否把数据正常添加到数据库。
错误处理和路由跳转 这儿添加的时候有可能会出错,所以最好进行下 try catch …
1 2 3 4 5 6 7 8 9 10 11 12 13 14 15 16 17 18 19 20 21 22 23 24 25 try { await prisma.topic .create ({ data : { name : result.data .name , description : result.data .description , userId : session.user .id !, }, }); } catch (err : unknown ) { if (err instanceof Error ) { return { errors : { _form : [err.message ], }, }; } else { return { errors : { _form : ["Something went wrong." ], }, }; } }
测试
1 2 3 try { throw new Error ('Failed to create topic' ) }
最后如果添加成功,其实我们要跳转到针对当前话题的话题列表页,或者说叫话题详情页也行。
1 redirect (`/topics/${topic.name} ` );
当然对应的,我们也要建一个话题详情页的路由页面,src\app\topics[name]\page.tsx
1 2 3 4 5 6 7 8 9 10 import React from "react" ;interface TopicShowPageProps { params : Promise <{ name : string }>; } export default async function TopicShowPage ({ params }: TopicShowPageProps ) { const name = (await params).name ; return <div > 针对 {name} 话题的列表页</div > }
添加 loading 效果 接下来我们给创建话题的按钮添加一个 loading 效果,如何去做呢?
我们帮大家回忆一下前面学习的知识点,大家点开 …,其实在 Next.14 中要单独抽离一个按钮组件,然后利用 useFormStatus 拿到 pending 状态,在前面的视频中咱单独给大家讲过,但咱现在的 Next15 版本就没必要这么麻烦了,咱可以找到添加话题的这个组件,可以直接在 useActionState 返回的数组中解构出第三个参数,例如叫 isPending,这个第三个参数啊,就可以直接表示 ServerAction 返回的状态,最后我们把这个状态和按钮组件的 isLoading 属性结合起来就好啦。
最后为了方便看到测试效果,我们可以建个睡眠函数,在 ServerAction 执行之前先调用这个睡眠函数,最后创建话题,点击按钮进行测试。
1 2 3 4 5 6 7 8 9 10 11 12 13 14 15 16 17 18 "use client" ;import { useFormStatus } from "react-dom" ;import { Button } from "@nextui-org/react" ;interface FormButtonProps { children : React .ReactNode ; } export default function FormButton ({ children }: FormButtonProps ) { const { pending } = useFormStatus (); return ( <Button type ="submit" isLoading ={pending} > {children} </Button > ); }
actions/create-topic.ts
1 2 3 4 5 6 const sleep = (ms: number ) => new Promise ((resolve ) => setTimeout (resolve, ms));export async function createTopic (prevState: CreateTopicFormState, formData: FormData ): Promise <CreateTopicFormState > { await sleep (3000 ); }
src\components\topic-create-form.tsx
1 2 3 4 5 6 7 8 9 10 11 12 13 14 15 16 17 18 19 20 21 export default function TopicCreateForm ( const [state, formAction, isPending] = useActionState (actions.createTopic , { errors : {}, }); return ( <Popover placement ="left" > {/*...*/} <PopoverContent > <form onSubmit ={handleSubmit} noValidate > <div className ="flex flex-col gap-4 p-4 w-80" > {/*...*/} <Button isLoading ={isPending} type ="submit" > Submit </Button > </div > </form > </PopoverContent > </Popover > ); }
在首页展示话题列表 src\components\topic-list.tsx
1 2 3 4 5 6 7 8 9 10 11 12 13 14 15 16 17 18 19 20 21 22 23 import { prisma } from "@/prisma" ;import { Badge , Chip } from "@nextui-org/react" ;import Link from "next/link" ;export const ListboxWrapper = ({ children }: { children: React.ReactNode } ) => ( <div className ="max-w-[260px] p-3 rounded-small border-2 mt-4 flex gap-3 flex-wrap" > {children}</div > ); export default async function TopicList ( const topics = await prisma.topic .findMany (); return ( <ListboxWrapper > {topics.map((topic) => { return ( <Chip variant ="shadow" color ="default" key ={topic.id} > <Link href ={ `/topics /${topic.name }`} className ="text-xs" > {topic.name} </Link > </Chip > ); })} </ListboxWrapper > ); }
src/app/page.tsx
1 2 3 4 5 6 7 8 9 10 11 12 13 14 15 16 import TopicCreateForm from "@/components/topic-create-form" ;import TopicList from "@/components/topic-list" ;export default function Page ( return ( <div className ="flex justify-between" > <div > <h1 className ="text-xl mt-2" > Top Posts</h1 > </div > <div > <TopicCreateForm /> <TopicList /> </div > </div > ); }
创建话题的按钮居右对齐,src\components\topic-create-form.tsx
1 <Button color="secondary" variant="bordered" className="block ml-auto" ></Button >
展示当前话题下的帖子的数量,拆分查询到单独的文件,prisma/queries/topics.ts
1 2 3 4 5 6 7 8 9 10 11 12 13 14 15 16 17 18 19 20 21 22 23 24 25 26 27 export default async function TopicList ( const topics = await prisma.topic .findMany ({ include : { _count : { select : { posts : true , }, }, }, }); console .log (topics); return ( <ListboxWrapper > {topics.map((topic) => { return ( <Badge color ="secondary" content ={topic._count.posts} shape ="circle" size ="sm" key ={topic.id} > <Chip variant ="shadow" color ="default" > <Link href ={ `/topics /${topic.name }`} className ="text-xs" > {topic.name} </Link > </Chip > </Badge > ); })} </ListboxWrapper > ); }
某一帖子界面 src\app\topics[name]\page.tsx
1 2 3 4 5 6 7 8 9 10 11 12 13 14 15 16 17 18 19 20 21 import PostCreateForm from "@/components/posts/post-create-form" ;import PostList from "@/components/posts/posts-list" ;interface TopicShowPageProps { params : Promise <{ name : string }>; } export default async function TopicShowPage ({ params }: TopicShowPageProps ) { const name = (await params).name ; return ( <div className ="flex justify-between" > <div className ="w-3/5" > <h1 className ="text-xl mt-2 pl-2" > {name}</h1 > <PostList /> </div > <div > <PostCreateForm /> </div > </div > ); }
PostList 组件 准备某个话题下对应的帖子列表组件,src\components\posts\posts-list.tsx。
1 2 3 4 5 6 7 8 9 10 11 12 13 14 15 16 17 18 19 20 21 22 23 24 25 26 27 28 29 30 31 32 "use client" ;import { Listbox , ListboxItem } from "@nextui-org/react" ;export default function PostList ( return ( <Listbox aria-label ="Posts List" itemClasses ={{ base: "border-small border-default-200 mt-4 ", }} > <ListboxItem description ={ <p className ="mt-3 text-small" > Hello Next</p > } endContent={<span className ="text-small text-gray-400 whitespace-nowrap self-end" > 88 comments</span > } onPress={() => { console.log("🤠"); }} > Next.js </ListboxItem > <ListboxItem description ={ <p className ="mt-3 text-small" > Hello Next</p > } endContent={<span className ="text-small text-gray-400 whitespace-nowrap self-end" > 88 comments</span > } onPress={() => { console.log("🤠"); }} > Next.js </ListboxItem > </Listbox > ); }
PostCreateForm 组件 src/components/posts/post-create-form.tsx
1 2 3 4 5 6 7 8 9 10 11 12 13 14 15 16 17 18 19 20 21 22 23 24 "use client" ;import { Button , Popover , PopoverTrigger , PopoverContent , Input , Textarea } from "@nextui-org/react" ;export default function PostCreateForm ( return ( <Popover placement ="left" > <PopoverTrigger > <Button color ="secondary" variant ="bordered" className ="block ml-auto" > Create a Post </Button > </PopoverTrigger > <PopoverContent > <form > <div className ="flex flex-col gap-4 p-4 w-80" > <h3 className ="text-lg" > Create a Post</h3 > <Input name ="title" label ="Title" labelPlacement ="outside" placeholder ="Title" /> <Textarea name ="content" label ="Content" labelPlacement ="outside" placeholder ="Content" /> <Button type ="submit" > Submit</Button > </div > </form > </PopoverContent > </Popover > ); }
添加帖子的 ServerAction src\actions\create-post.ts
1 2 3 4 5 6 7 8 9 10 11 12 13 14 15 16 17 18 19 20 21 22 23 24 25 26 27 28 29 30 31 32 33 34 35 36 37 38 39 40 41 42 43 44 45 46 47 48 49 50 51 52 53 54 55 56 57 58 59 60 61 62 63 64 65 66 67 68 69 70 71 72 73 74 75 76 77 78 79 80 81 "use server" ;import type { Post } from "@prisma/client" ;import { redirect } from "next/navigation" ;import { z } from "zod" ;import { auth } from "@/auth" ;import { prisma } from "@/prisma" ;const createPostSchema = z.object ({ title : z.string ().min (3 ), content : z.string ().min (10 ), }); interface CreatePostFormState { errors : { title?: string []; content?: string []; _form?: string []; }; } export async function createPost (name: string , formState: CreatePostFormState, formData: FormData ): Promise <CreatePostFormState > { const result = createPostSchema.safeParse ({ title : formData.get ("title" ), content : formData.get ("content" ), }); if (!result.success ) { return { errors : result.error .flatten ().fieldErrors , }; } const session = await auth (); if (!session || !session.user ) { return { errors : { _form : ["You must be signed in to do this" ], }, }; } const topic = await prisma.topic .findFirst ({ where : { name }, }); if (!topic) { return { errors : { _form : ["Cannot find topic" ], }, }; } let post : Post ; try { post = await prisma.post .create ({ data : { title : result.data .title , content : result.data .content , userId : session.user .id !, topicId : topic.id , }, }); } catch (err : unknown ) { if (err instanceof Error ) { return { errors : { _form : [err.message ], }, }; } else { return { errors : { _form : ["Failed to create post" ], }, }; } } redirect (`/topics/${name} /posts/${post.id} ` ); }
应用 ServerAction src\components\posts\post-create-form.tsx
1 2 3 4 5 6 7 8 9 10 11 12 13 14 15 16 17 18 19 20 21 22 23 24 25 26 27 28 29 30 31 32 33 34 35 36 37 38 39 40 41 42 43 44 45 46 47 48 49 50 51 52 53 54 55 56 "use client" ;import { Button , Popover , PopoverTrigger , PopoverContent , Input , Textarea } from "@nextui-org/react" ;import * as actions from "@/actions" ;import { useActionState } from "react" ;interface PostCreateFormProps { name : string ; } export default function PostCreateForm ({ name }: PostCreateFormProps ) { const [formState, action, isPending] = useActionState (actions.createPost .bind (null , name), { errors : {}, }); return ( <Popover placement ="left" > <PopoverTrigger > <Button color ="secondary" variant ="bordered" className ="block ml-auto" > Create a Post </Button > </PopoverTrigger > <PopoverContent > {/* #3 */} <form action ={action} > <div className ="flex flex-col gap-4 p-4 w-80" > <h3 className ="text-lg" > Create a Post</h3 > {/* #4 */} <Input isInvalid ={!!formState.errors.title} errorMessage ={formState.errors.title?.join( ", ")} name ="title" label ="Title" labelPlacement ="outside" placeholder ="Title" /> {/* #5 */} <Textarea isInvalid ={!!formState.errors.content} errorMessage ={formState.errors.content?.join( ", ")} name ="content" label ="Content" labelPlacement ="outside" placeholder ="Content" /> {/* #6 */} {formState.errors._form ? <div className ="rounded p-2 bg-red-200 border border-red-400" > {formState.errors._form.join(", ")}</div > : null} {/* #7 */} <Button isLoading ={isPending} type ="submit" > Submit </Button > </div > </form > </PopoverContent > </Popover > ); }
准备帖子详情界面 src\app\topics[name]\posts[postId]\page.tsx
1 2 3 4 5 6 7 8 9 10 11 12 13 14 15 16 17 18 import React from "react" ;interface PostShowPageProps { params : { name : string ; postId : string ; }; } export default async function PostShowPage ({ params }: PostShowPageProps ) { const { name, postId } = await params; return ( <div > <p > {name}</p > <p > {postId}</p > </div > ); }
获取当前话题下的帖子列表 src\prisma\queries\posts.ts
1 2 3 4 5 6 7 8 9 10 11 12 13 14 15 16 17 18 19 import type { Post } from "@prisma/client" ;import { prisma } from ".." ;export type PostWithData = Post & { topic : { name : string }; user : { name : string | null }; _count : { comments : number }; }; export function fetchPostsByTopicname (name: string ): Promise <PostWithData []> { return prisma.post .findMany ({ where : { topic : { name } }, include : { topic : { select : { name : true } }, user : { select : { name : true } }, _count : { select : { comments : true } }, }, }); }
src\app\topics[name]\page.tsx
1 2 3 4 5 6 7 8 9 10 11 12 13 14 15 16 17 18 19 20 21 22 23 import PostCreateForm from "@/components/posts/post-create-form" ;import PostList from "@/components/posts/posts-list" ;import { fetchPostsByTopicName } from "@/prisma/queries/posts" ;interface TopicShowPageProps { params : Promise <{ name : string }>; } export default async function TopicShowPage ({ params }: TopicShowPageProps ) { const name = (await params).name ; const posts = await fetchPostsByTopicName (name); return ( <div className ="flex justify-between" > <div className ="w-3/5" > <h1 className ="text-xl mt-2 pl-2" > {name}</h1 > <PostList posts ={posts} /> </div > <div > <PostCreateForm name ={name} /> </div > </div > ); }
src\components\posts\posts-list.tsx
1 2 3 4 5 6 7 8 9 10 11 12 13 14 15 16 17 18 19 20 21 22 23 24 25 26 27 28 29 30 31 32 33 34 35 36 37 38 "use client" ;import { PostWithData } from "@/prisma/queries/posts" ;import { Listbox , ListboxItem } from "@nextui-org/react" ;import { useRouter } from "next/navigation" ;export default function PostList ({ posts }: { posts: PostWithData[] } ) { const router = useRouter (); const renderedPosts = posts.map ((post ) => { const topicName = post.topic .name ; if (!topicName) { throw new Error ("Need a slug to link to a post" ); } return ( <ListboxItem key ={post.id} description ={ <p className ="mt-3 text-small" > {post.content}</p > } endContent={<span className ="text-small text-gray-400 whitespace-nowrap self-end" > {post._count.comments} comments</span > } onPress={() => { router.push(`/topics/${topicName}/posts/${post.id}`); }} > {post.title} </ListboxItem > ); }); return ( <Listbox aria-label ="Posts List" itemClasses ={{ base: "border-small border-default-200 mt-4 ", }} > {renderedPosts} </Listbox > ); }
获取首页的帖子列表 src\db\queries\posts.ts
1 2 3 4 5 6 7 8 9 10 11 12 13 14 15 16 17 export function fetchTopPosts (Promise <PostWithData []> { return db.post .findMany ({ orderBy : [ { comments : { _count : "desc" , }, }, ], include : { topic : { select : { slug : true } }, user : { select : { name : true , image : true } }, _count : { select : { comments : true } }, }, take : 5 , }); }
给 Logo 和其他地方添加链接,src\components\header.tsx
1 2 3 4 5 6 <NavbarBrand > <Link href ="/" className ="flex items-center" > <AcmeLogo /> <p className ="font-bold text-inherit" > DISCUSS</p > </Link > </NavbarBrand >
帖子详情 1. 添加跳转;
2. 准备帖子详情静态页面;
1 2 3 4 5 6 7 8 9 10 11 12 13 14 15 16 17 import { Button , Textarea } from "@nextui-org/react" ;interface PostShowPageProps { params : { name : string ; postId : string ; }; } export default async function PostShowPage ({ params }: PostShowPageProps ) { return ( <div > <h1 className ="text-2xl font-bold my-2" > Title</h1 > <p className ="p-4 border rounded" > Content</p > </div > ); }
3. 获取帖子详情;
1 2 3 4 5 6 7 8 9 10 11 12 13 14 15 16 17 18 19 20 21 22 23 24 25 26 import { prisma } from "@/prisma" ;import { notFound } from "next/navigation" ;interface PostShowPageProps { params : { name : string ; postId : string ; }; } export default async function PostShowPage ({ params }: PostShowPageProps ) { const post = await prisma.post .findFirst ({ where : { id : params.postId }, }); if (!post) { notFound (); } return ( <div > <h1 className ="text-2xl font-bold my-2" > {post.title}</h1 > <p className ="p-4 border rounded" > {post.content}</p > </div > ); }
拆分组件优化 目前来说,其实把获取详情的请求和 UI,直接放到整个页面中并不是最好的方式,因为这个页面,后面可能还有其他更多的业务,所以我们把这个详情的代码拆分为一个单独的组件会更好一些。
而且我们把这个请求数据的操作放到组件里面进行,这样即便请求很慢,我们还可以在外部使用拆分出来的整个组件的时候啊配合 Suspense 来优化加载体验。
ok,咱把整个过程来通过代码实现一下。
1 2 3 4 5 6 7 8 9 10 11 12 13 import PostShow from "@/components/posts/post-show" ;interface PostShowPageProps { params : { name : string ; postId : string ; }; } export default async function PostShowPage ({ params }: PostShowPageProps ) { const { postId } = await params; return <PostShow postId ={postId} /> }
src\components\posts\post-show.tsx
1 2 3 4 5 6 7 8 9 10 11 12 13 14 15 16 17 18 19 20 21 22 23 import { notFound } from "next/navigation" ;import { prisma } from "@/prisma" ;interface PostShowProps { postId : string ; } export default async function PostShow ({ postId }: PostShowProps ) { const post = await prisma.post .findFirst ({ where : { id : postId }, }); if (!post) { notFound (); } return ( <div > <h1 className ="text-2xl font-bold my-2" > {post.title}</h1 > <p className ="p-4 border rounded" > {post.content}</p > </div > ); }
如何给组件添加 loading,或者骨架屏 …
src\app\topics[name]\posts[postId]\page.tsx
1 2 3 4 5 6 7 8 9 10 11 12 13 14 15 16 17 18 19 import PostShow from "@/components/posts/post-show" ;import PostShowLoading from "@/components/posts/post-show-loading" ;import { Suspense } from "react" ;interface PostShowPageProps { params : { name : string ; postId : string ; }; } export default async function PostShowPage ({ params }: PostShowPageProps ) { const { postId } = await params; return ( <Suspense fallback ={ <PostShowLoading /> }> <PostShow postId ={postId} /> </Suspense > ); }
src\components\posts\post-show-loading.tsx
1 2 3 4 5 6 7 8 9 10 11 12 13 14 15 16 import { Skeleton } from "@nextui-org/react" ;export default function PostShowLoading ( return ( <> <div className ="my-2" > <Skeleton className ="h-8 w-48" /> </div > <div className ="p-4 border rounded space-y-2" > <Skeleton className ="h-6 w-32" /> <Skeleton className ="h-6 w-32" /> <Skeleton className ="h-6 w-32" /> </div > </div > ); }
准备评论组件 1. 准备评论组件的结构;
1 2 3 4 5 6 7 8 9 10 11 12 13 14 15 16 17 18 19 20 21 22 23 24 25 26 27 28 29 30 31 32 33 import PostShow from "@/components/posts/post-show" ;import PostShowLoading from "@/components/posts/post-show-loading" ;import { prisma } from "@/prisma" ;import { Button , Textarea } from "@nextui-org/react" ;import { notFound } from "next/navigation" ;import React , { Suspense } from "react" ;interface PostShowPageProps { params : { name : string ; postId : string ; }; } export default async function PostShowPage ({ params }: PostShowPageProps ) { const { name, postId } = await params; return ( <div className ="space-y-3" > <Suspense fallback ={ <PostShowLoading /> }> <PostShow postId ={postId} /> </Suspense > <form > <div className ="space-y-3" > <Textarea name ="content" label ="Reply" labelPlacement ="inside" placeholder ="Enter your comment" /> <Button color ="secondary" variant ="bordered" > Create Comment </Button > </div > </form > </div > ); }
2. 拆分评论组件;
src\components\comments\comment-create-form.tsx
1 2 3 4 5 6 7 8 9 10 11 12 13 14 import { Textarea , Button } from "@nextui-org/react" ;export default function CommentCreateForm ( return ( <form > <div className ="space-y-3" > <Textarea name ="content" label ="Reply" labelPlacement ="inside" placeholder ="Enter your comment" /> <Button color ="secondary" variant ="bordered" > Create Comment </Button > </div > </form > ); }
3. 引入评论组件。
完成评论功能 创建 ServerAction,src\actions\create-comment.ts
1 2 3 4 5 6 7 8 9 10 11 12 13 14 15 16 17 18 19 20 21 22 23 24 25 26 27 28 29 30 31 32 33 34 35 36 37 38 39 40 41 42 43 44 45 46 47 48 49 50 51 52 53 54 55 56 57 58 59 60 61 62 63 64 65 66 67 68 "use server" ;import { z } from "zod" ;import { auth } from "@/auth" ;import { prisma } from "@/prisma" ;const createCommentSchema = z.object ({ content : z.string ().min (3 ), }); interface CreateCommentFormState { errors : { content?: string []; _form?: string []; }; } export async function createComment ( { postId }: { postId: string }, formState: CreateCommentFormState, formData: FormData Promise <CreateCommentFormState > { const result = createCommentSchema.safeParse ({ content : formData.get ("content" ), }); if (!result.success ) { return { errors : result.error .flatten ().fieldErrors , }; } const session = await auth (); if (!session || !session.user ) { return { errors : { _form : ["You must sign in to do this." ], }, }; } try { await prisma.comment .create ({ data : { content : result.data .content , postId : postId, userId : session.user .id !, }, }); } catch (err) { if (err instanceof Error ) { return { errors : { _form : [err.message ], }, }; } else { return { errors : { _form : ["Something went wrong..." ], }, }; } } return { errors : {}, }; }
使用 ServerAction,src\components\comments\comment-create-form.tsx
1 2 3 4 5 6 7 8 9 10 11 12 13 14 15 16 17 18 19 20 21 22 23 24 25 26 27 28 29 30 31 32 33 34 "use client" ;import { Button , Textarea } from "@nextui-org/react" ;import React , { startTransition, useActionState } from "react" ;import * as actions from "@/actions" ;interface CommentCreateFormProps { postId : string ; } export default function CommentCreateForm ({ postId }: CommentCreateFormProps ) { const [state, formAction, isPending] = useActionState (actions.createComment .bind (null , { postId }), { errors : {} }); function handleSubmit (event: React.FormEvent<HTMLFormElement> ) { event.preventDefault (); const formData = new FormData (event.target as HTMLFormElement ); startTransition (() => formAction (formData)); } return ( <form className ="space-y-3" onSubmit ={handleSubmit} noValidate > <Textarea name ="content" label ="Reply" labelPlacement ="inside" placeholder ="Enter your comment" isInvalid ={!!state.errors.content} errorMessage ={state.errors.content?.join( ", ")} /> {state.errors._form ? <div className ="p-2 bg-red-200 border rounded border-red-400" > {state.errors._form?.join(", ")}</div > : null} <Button type ="submit" isLoading ={isPending} color ="secondary" variant ="bordered" > Create Comment </Button > </form > ); }
准备评论的静态结构 src\components\comments\comment-list.tsx
1 2 3 4 5 6 7 8 9 10 11 12 13 14 15 16 17 18 19 20 21 22 import Image from "next/image" ;export default function CommentList ( return ( <div className ="space-y-3" > <h1 className ="text-lg font-bold" > All 5 comments</h1 > {/* 1 */} <div className ="p-4 border mt-2 rounded" > <div className ="flex gap-3" > <Image src ="/avatar.jpg" alt ="user image" width ={40} height ={40} className ="w-10 h-10 rounded-full" /> <div className ="flex-1 space-y-3" > <p className ="text-sm font-medium text-gray-500" > Ifer</p > <p className ="flex justify-between" > <span className ="text-gray-900" > Hello</span > <span className ="text-sm text-gray-400" > 2030 年 1 月 1 日</span > </p > </div > </div > </div > </div > ); }
获取数据库,src\db\queries\comments.ts
1 2 3 4 5 6 7 8 9 10 11 12 13 14 15 16 17 18 19 20 import type { Comment } from "@prisma/client" ;import { prisma } from ".." ;export type CommentWithAuthor = Comment & { user : { name : string | null ; image : string | null }; }; export function fetchCommentsByPostId (postId: string ): Promise <CommentWithAuthor []> { return prisma.comment .findMany ({ where : { postId }, include : { user : { select : { name : true , image : true , }, }, }, }); }
1 dayjs (r[0 ].createdAt ).format ("YYYY/M/D H:m:s" );
循环渲染
1 2 3 4 5 6 7 8 interface CommentListProps { postId : string ; } export default async function CommentList ({ postId }: CommentListProps ) { const comments = await fetchCommentsByPostId (postId); }
图片 URL 白名单,next.config.ts
1 2 3 4 5 6 7 8 9 10 11 12 13 14 import type { NextConfig } from "next" ;const nextConfig : NextConfig = { images : { remotePatterns : [ { hostname : "avatars.githubusercontent.com" , }, ], }, }; export default nextConfig;
处理数据不更新的问题
好,接下来我们看一下,添加评论后数据没有马上更新的问题该如何处理,我们不妨问一下 GPT?
这是我的问题:
1 2 3 4 5 6 7 8 9 10 11 12 下面是 Next.js 15 版本中的一个页面的代码,如下: export default async function PostShowPage return ( <div className="space-y-3" > <CommentCreateForm/> <CommentList/> </div> ); } 我在 CommentCreateForm 组件通过 form 表单配合 server action 往数据库添加了数据,CommentList 组件中从数据库获取了数据,问题是:如果我新添加了一条数据,CommentList 不会获取到最新的内容,原因是什么,如何解决?
它的意思是说 CommentList 是在初始化时有服务器渲染并静态生成的,即便后续通过 CommentCreateForm 往数据库提交了数据,并没有触发 CommentList 重新获取数据的机制,所以也就没有变化。那怎么办呢?
它告诉了我们几种处理这个问题的思路:第一种需要把相关组件改为客户端组件,就比如说可以在父组件定义一个状态和修改状态的方法,接下来把修改状态的方法传递给 CommentCreateForm 这个子组件,子组件内部进行数据提交的时候再调用一下传递过去的这个方法,子组件一旦调用了父组件修改状态的方法,那么整个父组件就会重新进行渲染,当然 CommentList 当中的数据也会进行重新获取。好,这确实是一种方法,但这种改成客户端组件的方式对我们来说代价太大了,所以这种方法我们 PASS。
第二个处理方式它说,如果你希望保留 Server Component 的性质,可以在 CommentCreateForm 组件的 Server Action 中调用 revalidatePath 来重新触发页面或者说路径的重新验证。前面我们讲过 revalidatePath 是用来重新验证缓存的,而验证缓存的时候其实这个对应页面的代码也会被重新执行,其实这种解决问题的方式正是利用“重新执行”这个特点来做到的。
第三种处理方式它说可以使用 SWR,SWR 是一个用于数据获取的 React Hooks 库,它是由 Vercel 团队开发的,但是我们还没学过,所以也先不采用,所综合下来我们可以采用第二种处理方式会更合适一些。
1 2 3 4 5 6 7 8 9 10 11 12 13 14 15 16 17 const topic = await prisma.topic .findFirst ({ where : { posts : { some : { id : postId } } }, }); if (!topic) { return { errors : { _form : ["Failed to revalidate topic" ], }, }; } revalidatePath (`/topics/${topic.name} /posts/${postId} ` );
评论成功后重置表单 好接下来我们再处理一个小问题,添加数据成功后这儿输入的内容应该进行重置,这个该如何去做呢?
其实思路是这样的,我们打开 VSCode 先找到这个组件,每次添加成功都会触发 state 状态的变更,所以我们可以在状态变更的时候调用表单的重置方法就好了。
src\components\comments\comment-create-form.tsx
1 2 3 4 5 6 7 8 9 10 11 12 13 14 15 16 17 18 "use client" ;export default function CommentCreateForm ({ postId }: CommentCreateFormProps ) { const ref = useRef<HTMLFormElement | null >(null ); useEffect (() => { if (state.success ) { ref.current ?.reset (); } }, [state]); return ( <form className ="space-y-3" onSubmit ={handleSubmit} noValidate ref ={ref} > {/*...*/} </form > ); }
src\actions\create-comment.ts
1 2 3 4 5 6 7 8 9 10 11 12 13 14 15 16 17 18 19 20 21 22 23 24 25 26 27 28 "use server" ;interface CreateCommentFormState { errors : { content?: string []; _form?: string []; }; success?: boolean ; } export async function createComment ( { postId }: { postId: string }, prevState: CreateCommentFormState, formData: FormData Promise <CreateCommentFormState > { return { errors : {}, success : true , }; }
展示对评论进行回复的组件 1. src\components\comments\comment-show.tsx;
1 2 3 4 5 6 7 8 9 10 11 12 13 14 export default function CommentShow ({ comment }: { comment: CommentWithUser } ) { return ( <div className ="border mt-2 p-4 rounded" > <div className ="flex gap-3" > {/*...*/} <div className ="flex-1" > {/*...*/} <CommentCreateForm postId ={comment.postId} /> </div > </div > </div > ); }
2. src\components\comments\comment-create-form.tsx;
1 2 3 4 5 6 7 8 9 10 11 12 13 14 15 16 17 18 19 20 21 22 23 24 25 26 27 28 29 30 31 32 33 34 35 36 37 38 "use client" ;export default function CommentCreateForm ({ postId }: CommentCreateFormProps ) { const ref = useRef<HTMLFormElement | null >(null ); const [open, setOpen] = useState (false ); return ( <div className ="space-y-3 mt-3" > {/* #2 */} <Button size ="sm" variant ="shadow" color ="default" onClick ={() => setOpen(!open)}> Reply </Button > {/* #3 */} {open && ( <form className ="space-y-3" onSubmit ={handleSubmit} noValidate ref ={ref} > <Textarea name ="content" label ="Reply" labelPlacement ="inside" placeholder ="Enter your comment" isInvalid ={!!state.errors.content} errorMessage ={state.errors.content?.join( ", ")} /> {state.errors._form ? ( <Chip variant ="bordered" radius ="sm" className ="max-w-full" > {state.errors._form.join(", ")} </Chip > ) : null} <Button isLoading ={isPending} type ="submit" color ="secondary" variant ="bordered" > Create Comment </Button > </form > )} </div > ); }
3. 默认展示对帖子进行评论的框。
1 2 3 4 5 6 7 8 9 10 11 12 interface CommentCreateFormProps { postId : string ; isOpen?: boolean ; } export default function CommentCreateForm ({ postId, isOpen }: CommentCreateFormProps ) { const ref = useRef<HTMLFormElement | null >(null ); const [open, setOpen] = useState (isOpen); }
src\app\topics[name]\posts[postId]\page.tsx
1 <CommentCreateForm postId={postId} isOpen />
对评论进行回复的功能 1. 使用嵌套的 CommentCreateForm 的时候传递 parentId;
src\components\comments\comment-show.tsx
1 <CommentCreateForm postId={comment.postId } parentId={comment.id } />
2. 接收 parentId 并传递到 Server Action 中;
1 2 3 4 5 6 7 8 9 10 11 12 13 interface CommentCreateFormProps { postId : string ; isOpen?: boolean ; parentId?: string ; } export default function CommentCreateForm ({ postId, isOpen, parentId }: CommentCreateFormProps ) { const ref = useRef<HTMLFormElement | null >(null ); const [open, setOpen] = useState (isOpen); const [state, formAction, isPending] = useActionState (actions.createComment .bind (null , { postId, parentId }), { errors : {}, }); }
3. Server Action 中接受 parentId 进行查询。
src\actions\create-comment.ts
1 2 3 4 5 6 7 8 9 10 11 12 13 14 15 16 17 18 19 20 21 22 23 "use server" ;export async function createComment ( { postId, parentId }: { postId: string ; parentId?: string }, prevState: CreateCommentFormState, formData: FormData Promise <CreateCommentFormState > { try { await prisma.comment .create ({ data : { content : result.data .content , userId : session.user .id !, postId, parentId, }, }); } catch (err : unknown ) { } }
4. 点击发表会发现跑到了第一级,实际上第一级显示的应该只是 parentId 等于 null 的,所以我们要对第一级数据的展示进行一个筛选;
src\components\comments\comment-list.tsx
1 2 3 4 5 6 7 8 9 10 11 12 13 14 15 16 export default async function CommentList ({ postId }: CommentListProps ) { const comments = await fetchCommentsByPostId (postId); const topLevelComments = comments.filter ((comment ) => comment.parentId === null ); return ( <div className ="space-y-3" > <h1 className ="text-lg font-bold" > All 20 comments</h1 > {/* #2 */} {topLevelComments.map((comment) => ( <CommentShow key ={comment.id} comment ={comment} /> ))} </div > ); }
展示当前评论的回复列表 渲染对评论的回复,src\components\comments\comment-show.tsx。
1 2 3 4 5 6 7 8 9 10 11 12 13 14 15 16 17 18 19 20 21 export default async function CommentShow ({ comment }: { comment: CommentWithUser } ) { const comments = await fetchCommentsByPostId (comment.postId ); const children = comments.filter ((c ) => c.parentId === comment.id ); return ( <div className ={ `border mt-2 p-4 rounded ${comment.parentId !== null && "border-dashed "}`}> {/*...*/} {/* #3 */} <div className ="pl-12" > {children.map((child) => ( <CommentShow key ={child.id} comment ={child} /> ))} </div > </div > ); }
请求数据库缓存 会发现数据库查询了好多次,实际上来说我们现在是请求的是同一个帖子下面的所有评论,数据都是一样的,其实发起一次请求就好了,如何解决呢?
第一种解决办法,我们从 comment-list 组件把 comments 传递过去即可。
当然还有一种解决办法是咱想给大家重点介绍的,那就是可以给数据库查询的时候添加缓存,可以借助 React 提供的 cache 函数来完成这个功能。
src\prisma\queries\comments.ts
1 2 3 4 5 6 7 8 9 10 11 12 13 14 15 16 17 18 19 20 21 22 23 24 25 26 27 28 import type { Comment } from "@prisma/client" ;import { prisma } from ".." ;import { cache } from "react" ;export type CommentWithUser = { user : { name : string | null ; image : string | null ; }; } & Comment ; export const fetchCommentsByPostId = cache (async (postId : string ): Promise <CommentWithUser []> => { console .log ("🤠🤠" ); return prisma.comment .findMany ({ where : { postId, }, include : { user : { select : { name : true , image : true , }, }, }, }); });
给评论列表上面加一些间隙。
src\components\comments\comment-list.tsx
1 <div className="space-y-3 !mt-10" ></div>
抽离搜索组件 好,接下来咱编写一下这个搜索的功能,咱希望能够根据帖子的标题和内容进行搜索。这个交互是这样的,当我们输入内容,然后敲回车的时候,会跳转到一个新的搜索页面,然后我们在这个新的搜索页面中拿到输入的内容,根据输入的内容查询数据库,然后渲染对应的帖子列表。
首先我们把这个搜索的样式啊给他弄得好看一些,NextUI 提供的有相关的样式,咱粘过来进行一个改造:
src\components\search-input.tsx
1 2 3 4 5 6 7 8 9 10 11 12 13 <div className="w-[190px] rounded-2xl flex justify-center items-center bg-gradient-to-tr from-purple-200 to-white text-white" > <Input name ="pnameorcon" isClearable classNames ={{ input: ["bg-transparent ", "text-black /90 dark:text-white /90 ", "placeholder:text-default-700 /50 dark:placeholder:text-white /60 "], innerWrapper: "bg-transparent ", inputWrapper: ["!bg-default-200 /50 ", "backdrop-blur-xl ", "backdrop-saturate-200 ", "!cursor-text "], }} placeholder ="Type to search..." radius ="lg" /> </div>
编写搜索的 Server Action 就是敲一下回车的时候,调用这个 Server Action,server action 内部接收一下新的参数,然后跳转到新的搜索页面的时候把这个参数也带上。
src\actions\search.ts
1 2 3 4 5 6 7 8 9 10 11 12 13 "use server" ;import { redirect } from "next/navigation" ;export async function search (formData: FormData ) { const pnameorcon = formData.get ("pnameorcon" ); if (typeof pnameorcon !== "string" || !pnameorcon) { redirect ("/" ); } redirect (`/search?pnameorcon=${pnameorcon} ` ); }
调用 server action
1 2 3 4 5 6 7 8 9 10 import { Input } from "@nextui-org/react" ;import * as actions from "@/actions" ;export default function SearchInput ( return ( <div className ="w-[190px] rounded-2xl flex justify-center items-center bg-gradient-to-tr from-purple-200 to-white text-white" > <form action ={actions.search} > {/*...*/}</form > </div > ); }
准备 search 页面 1 2 3 4 5 6 7 8 9 10 11 12 13 14 15 16 17 import { redirect } from "next/navigation" ;interface SearchPageProps { searchParams : Promise <{ pnameorcon : string ; }>; } export default async function SearchPage ({ searchParams }: SearchPageProps ) { const { pnameorcon } = await searchParams; if (!pnameorcon) { redirect ("/" ); } return <div > {pnameorcon}</div > }
准备去数据库查询的方法 src\prisma\queries\posts.ts
1 2 3 4 5 6 7 8 9 10 11 12 export function fetchPostsByPnameorcon (pnameorcon: string ): Promise <PostWithData []> { return prisma.post .findMany ({ include : { topic : { select : { name : true } }, user : { select : { name : true , image : true } }, _count : { select : { comments : true } }, }, where : { OR : [{ title : { contains : pnameorcon } }, { content : { contains : pnameorcon } }], }, }); }
页面中调用方法和组件 1 2 3 4 5 6 7 8 9 10 11 12 13 14 15 16 17 18 19 20 21 22 23 24 import PostList from "@/components/posts/post-list" ;import { fetchPostsByPnameorcon } from "@/prisma/queries/posts" ;import { redirect } from "next/navigation" ;interface SearchPageProps { searchParams : Promise <{ pnameorcon : string ; }>; } export default async function SearchPage ({ searchParams }: SearchPageProps ) { const { pnameorcon } = await searchParams; if (!pnameorcon) { redirect ("/" ); } const posts = await fetchPostsByPnameorcon (pnameorcon); return <PostList posts ={posts} /> }
回显搜索内容 src\components\search-input.tsx
1 2 3 4 5 6 7 8 9 10 11 12 13 14 15 16 17 18 19 20 21 22 23 24 25 26 27 28 29 30 31 32 33 34 "use client" ;import { Input } from "@nextui-org/react" ;import React , { useEffect, useState } from "react" ;import * as actions from "@/actions" ;import { useSearchParams } from "next/navigation" ;export default function SearchInput ( const searchParams = useSearchParams (); const [searchCon, setSearchCon] = useState (searchParams.get ("pnameorcon" ) || "" ); useEffect (() => { setSearchCon (searchParams.get ("pnameorcon" ) || "" ); }, [searchParams]); return ( <div className ="w-[190px] rounded-2xl flex justify-center items-center bg-gradient-to-tr from-purple-200 to-white text-white" > <form action ={actions.search} > <Input value ={searchCon} onChange ={(e) => { setSearchCon(e.target.value); }} isClearable name="pnameorcon" classNames={{ input: ["bg-transparent", "text-black/90 dark:text-white/90", "placeholder:text-default-700/50 dark:placeholder:text-white/60"], innerWrapper: "bg-transparent", inputWrapper: ["!bg-default-200/50", "backdrop-blur-xl", "backdrop-saturate-200", "!cursor-text"], }} placeholder="Type to search..." radius="lg" /> </form > </div > ); }
Gitee 认证 前面的登录功能咱使用的是 Github 进行的 OAuth 认证,但是我估计啊有同学在操作的时候可能会碰到网络问题,所以咱这儿呢,再给大家添加一种认证方式就是 Gitee 认证。
要想通过 auth.js 配合 Gitee 进行 OAuth 认证,就需要 provider,但是我们打开 auth.js 官方网站,在 providers 这儿进行查找,其实并没有 gitee 相关的 provide,那怎么办呢?
其实这时候咱可以参考 Github 的 Provider 进行手动改造,大家想看 Github 的 provide 源码,可以通过这儿找到 …
那我这儿呢,已经提前改造完毕,大家打开这个网页先直接粘贴过去使用即可,例如咱把这个代码粘贴到 … 文件。
1. 准备 Provider,src\providers\gitee.ts
https://github.com/ifer47/gitee-provider
2. 配置 Provider,src\auth.config.ts;
1 2 3 4 5 6 7 8 import GitHub from "next-auth/providers/github" ;import type { NextAuthConfig } from "next-auth" ;import Gitee from "./providers/gitee" ;export default { providers : [GitHub , Gitee ], } satisfies NextAuthConfig ;
3. 获取 AUTH_GITEE_ID 和 AUTH_GITEE_SECRET 并配置到 .env.local;
https://gitee.com/oauth/applications/new
1 2 AUTH_GITEE_ID="bb8e4cc416b9ef6b5c2887714a4f8d11b7eb7cdf02a560e4b13b27f39ee3ea3d" AUTH_GITEE_SECRET="10b7bbf0396eb980a008d1f43f2988129ab270f48eb4f134b8d7a1cd82edda2c"
4. 准备登录方法,src\actions\sign-in.ts;
1 2 3 4 5 6 7 8 9 "use server" ;import * as auth from "@/auth" ;export async function signIn ( return auth.signIn ("github" ); } export async function signInGitee ( return auth.signIn ("gitee" ); }
在 src\actions\index.ts 文件导出登录方法
1 2 export { signIn, signInGitee } from "./sign-in" ;
5. 准备登录按钮,src\components\header-auth.tsx;
1 2 3 <Button size="sm" type ="submit" color="secondary" variant="shadow" > Gitee </Button >
切换主题 好,接下来咱给大家做一下切换主题,或者说切换暗黑模式的功能,这个功能咱会借助 next-themes 这个包来操作。
1 npm install next-themes --legacy-peer-deps
src\app\providers.tsx
1 2 3 4 5 6 7 8 9 10 11 12 13 14 15 "use client" ;import { NextUIProvider } from "@nextui-org/react" ;import { SessionProvider } from "next-auth/react" ;import { ThemeProvider as NextThemesProvider } from "next-themes" ;export function Providers ({ children }: { children: React.ReactNode } ) { return ( <SessionProvider > <NextUIProvider > <NextThemesProvider > {children}</NextThemesProvider > </NextUIProvider > </SessionProvider > ); }
此时页面并不有什么特殊效果,这一步相当于只是在顶层使用了 React Context,储存了一个用于表示当前主题的值,默认是 “light”。
打开 F12 给大家看一下根节点属性的变化,此时根节点多了两个属性,一个是 data-theme="light",需要大家注意的是当我们进行主题切换,或者变为暗黑模式的时候,这个值会变成 dark,这一点非常重要,我们后面的主题切换正是利用这个特点来完成的。
另一个属性是 style="color-scheme: light;",这个属性的作用是:操作系统会根据用户选择的颜色方案对界面进行调整,包括表单控件、滚动条等系统的样式,当然如果你不希望这个特性的话可以通过 enableColorScheme 这个属性进行关闭。
好,接下来我们封装一个用于切换主题的组件。
src\components\ThemeSwitcher.tsx
1 npm i lucide-react --legacy-peer-deps
1 2 3 4 5 6 7 8 9 10 11 12 13 14 15 16 17 18 19 "use client" ;import { useTheme } from "next-themes" ;import { useEffect, useState } from "react" ;import { Moon , SunMoon } from "lucide-react" ;export default function ThemeSwitcher ( const [mounted, setMounted] = useState (false ); const { theme, setTheme } = useTheme (); const currentTheme = theme === "dark" ? "light" : "dark" ; useEffect (() => { setMounted (true ); }, []); if (!mounted) return null ; return <div onClick ={() => setTheme(currentTheme)}>{theme === "light" ? <Moon size ={15} /> : <SunMoon size ={15} color ="#fff" /> }</div > }
接下来在 header 当中引入这个切换主题的组件,点击切换主题,其实你会发现此时和 NextUI 相关组件的样式已经发生了变化,那是因为 NextUI 内部已经做了 dark 模式的颜色适配,这一块我们可以不用过多关心。
src\components\header.tsx
1 2 3 4 <NavbarContent justify="end" > <ThemeSwitcher /> <HeaderAuth /> </NavbarContent >
接下来还有一个问题,假如我要自定义 NextUI 以外的样式该如何处理呢?其实这里说的 NextUI 以外的样式又分为两种,一种是我们自己去定义的,另一种是我们通过 Tailwind 帮我们去定义。
首先我们看一下,如何定义自己 写的样式主题,这时候我们可以根据 HTML 属性的变化去写 CSS,就比如说我想控制暗色模式下的 body 的背景和字体的颜色,此时打开 src\app\globals.css,首先 @media 这一行媒体查询的代码我们可以不要,他是监听操作系统是否使用了深色主题,然后做一些对应处理,而我们期望手动来处理,接下来可以添加:
1 2 3 4 5 6 [data-theme="dark" ] { body { color : #ededed ; background : #0a0a0a ; } }
其实不但该 body,我们后续所有自定义的样式都可以写在这个内部进行覆盖,ok,NextUI 和自定义样式的暗黑模式的处理咱就先说到这儿,待会咱再说一下如何比较好的更改 Tailwind 暗黑模式下的相关的样式?好这个咱们待会再说。
单独调整暗色样式 单独调整暗色主题模式下的样式,如何单独调整呢?首先我们要配置 Tailwind.css 使支持 Dark Mode 的。修改 tailwind.config.js
1 2 3 module .exports = { darkMode : "class" , };
一旦我们这样配置了,后续我们在写的 tailwindcss 样式的前面可以添加 dark: 前缀,表示在暗色主题下会生效的样式,就比如:
1 "text-black dark:text-white" 展示了如何为一个元素定义不同主题下的样式
src\components\header.tsx
1 <Navbar className="shadow-md dark:shadow-purple-800" ></Navbar >
src\components\posts\post-list.tsx
1 2 3 4 5 6 7 8 <Listbox aria-label="Post List" itemClasses={{ base : "border-small border-default-200 mt-4 dark:border-purple-600" , }} > {} </Listbox >
src\components\topics\topic-list.tsx
1 <div className="max-w-[260px] p-3 rounded-small border-2 mt-4 flex gap-3 flex-wrap dark:border-purple-600" ></div>
详情页:src\components\posts\post-show.tsx
1 2 3 4 5 6 7 <> <h1 className ="text-2xl font-bold my-2" > {post.title}</h1 > <p className ="p-4 border rounded dark:border-purple-600" > {post.content}</p > </>
src\components\comments\comment-show.tsx
1 <div className={`border mt-2 p-4 rounded dark:border-purple-600 ${comment.parentId !== null && "border-dashed" } ` }></div>
src\components\comments\comment-list.tsx
1 <div className="space-y-3 !mt-8 pb-12" >{}</div>
src\components\search-input.tsx
1 2 3 4 5 6 <Input onClear={() => { setSearchCon ("" ); }} />
项目打包 2. 有一些定义但没使用的东西,./src/actions/create-comment.ts
3. img 标签要换成 Next.js 内置的 Image 组件;
1 <Image src={session.user .image || "https://i.pravatar.cc/150?u=a042581f4e29026024d" } alt="User Avatar" />
4. 处理类型错误,params 应该用 Promise 包裹,src\app\topics[name]\posts[postId]\page.tsx;
1 2 3 4 5 6 interface PostShowPageProps { params : Promise <{ name : string ; postId : string ; }>; }
5. useSearchParams() should be wrapped in a suspen;
src\components\header.tsx
1 2 3 <Suspense > <SearchInput /> </Suspense >
6. 移除所有的 console 和 sleep;
7. 指定 favicon 和网站的 title …
运行打包后的项目 1. 执行 npm start 本地测试启动;
2. 处理报错问题;
.env
3. 创建话题后,首页不更新问题;
全路由缓存,src\actions\create-topic.ts
4. 给切换主题组件的按钮加一点样式。
src\components\ThemeSwitcher.tsx
1 2 3 4 5 6 7 8 9 10 11 12 "use client" ;export default function ThemeSwitcher ( return ( <div onClick ={() => setTheme(currentTheme)} className="w-8 h-8 flex items-center justify-center rounded-lg bg-default-100 hover:bg-default-200"> {/*...*/} </div > ); }
打包上线 上线之前,假如数据库中的某条测试数据你不想要,如何删除?
拷贝到阿里云 ECS
1 2 3 4 5 6 7 8 9 10 11 12 cd workspacemkdir discusscd discussnrm ls npm i --legacy-peer-deps npx prisma db push && npx prisma generate
这时候我们再准备一个线上的 Github 和 Gitee 的 ID 和 Secret,放到 .env.production 文件中,当我们执行 npm run build 打包的时候,会优先读取 .env.production 这个文件中的环境变量。
1 格外注意:Gitee 的回调地址,https://discuss.zhihur.com/api/auth/callback/gitee
.env.production
1 2 3 4 5 6 7 AUTH_SECRET="Vx9DJOUvRJ5xDLC5kmRRhXU4GGwDiaJMwN676nS4ZEw=" AUTH_GITHUB_ID="Ov23lihqqWRhC77rybWg" AUTH_GITHUB_SECRET="f5436cf46be9f64933a68fb25aaa723626b07c78" AUTH_GITEE_ID="7845200b86f37b56de2294544070bc25850a44a2ac9946133a703be248e96544" AUTH_GITEE_SECRET="bd62c3a9d80846352e222856a32c28d18029cdbb8d04f639337abfd355438e17" AUTH_TRUST_HOST="discuss.zhihur.com"
1 2 3 4 5 6 7 npm run build pm2 list pm2 start npm --name "discuss" -- start
此时访问 http://121.40.238.160:3000/ 就可以看到项目啦。
接下来我们可以解析一个二级域名,打开阿里云,搜索域名,点击解析… 需要大家注意的是,这儿我们一般还需要一个证书,这样可以以 https 的方式访问这个域名,证书可以通过这儿获得,我这儿用的是免费的 … 大家可以下载过来这个证书,后面配置 Nginx 的时候会用到。
接下来我们打开 Nginx 配置。
1 2 3 4 5 6 7 8 9 10 11 12 13 14 15 16 17 18 whereis nginx cd /etc/nginx cat nginx.conf cd vhost
提示:如果 https 不生效把当前页面关了再重新打开尝试。
https://next-auth.js.org/configuration/options
这些完成之后还要再次回到 Next.js 项目中添加一个配置,就是把刚刚的那个 discuss 域名添加到配置文件里面,给大家看一眼
next.config.ts
1 2 3 4 5 6 7 8 9 10 11 12 13 14 15 16 17 18 19 20 21 22 import type { NextConfig } from "next" ;const nextConfig : NextConfig = { images : { remotePatterns : [ { hostname : "avatars.githubusercontent.com" , }, { hostname : "foruda.gitee.com" , }, ], }, experimental : { serverActions : { allowedOrigins : ["discuss.zhihur.com" ], }, }, }; export default nextConfig;
ok,一切完事之后最好重启一下项目。